Configure offline endpoints and air-gapped environments
Stack
By default, Elastic Endpoint continuously defends against the latest threats by automatically downloading global artifact updates from https://artifacts.security.elastic.co. When running Elastic Endpoint in a restricted network, you can set up a local mirror server to proxy updates to endpoints that cannot access elastic.co URLs directly.
- If your endpoints cannot access the internet directly, set up a local HTTP mirror server. Refer to Host an Elastic Endpoint artifact mirror.
- If your endpoints are running in an air-gapped environment, set up a local HTTP server and manually copy global artifact updates. Refer to Host an air-gapped Elastic Endpoint artifact server.
You can deploy your own Elastic Endpoint global artifact mirror to enable endpoints to update their global artifacts automatically through another server acting as a proxy. This allows endpoints to get updates even when they can’t directly access the internet.
Complete these steps:
- Deploy an HTTP reverse proxy server.
- Configure Elastic Endpoint to read from the proxy server.
Set up and configure an HTTP reverse proxy to forward requests to https://artifacts.security.elastic.co and include response headers from the elastic.co server when proxying.
The entity tag (Etag) header is a mandatory HTTP response header that you must set in your server configuration file. Elastic Endpoint uses the Etag header to determine whether your global artifacts have been updated since they were last downloaded. If your server configuration file does not contain an ETag header, Elastic Endpoint won’t download new artifacts when they’re available.
Example: Nginx
This example script starts an Nginx Docker image and configures it to proxy artifacts:
cat > nginx.conf << EOF
server {
  location / {
    proxy_pass https://artifacts.security.elastic.co;
  }
}
EOF
docker run -v "$PWD"/nginx.conf:/etc/nginx/conf.d/default.conf:ro -p 80:80 nginx
This example script is not appropriate for production environments. We recommend configuring the Nginx server to use TLS according to your IT policies. Refer to Nginx documentation for more information on downloading and configuring Nginx.
Example: Apache HTTPD
This example script starts an Apache httpd Docker image and configures it to proxy artifacts:
docker run --rm httpd cat /usr/local/apache2/conf/httpd.conf > httpd.conf
cat >> httpd.conf << EOF
LoadModule proxy_module modules/mod_proxy.so
LoadModule proxy_http_module modules/mod_proxy_http.so
LoadModule ssl_module modules/mod_ssl.so

SSLProxyEngine on
ServerName localhost
ProxyPass / https://artifacts.security.elastic.co/
ProxyPassReverse / https://artifacts.security.elastic.co/
EOF
docker run -p 80:80 -v "$PWD"/httpd.conf:/usr/local/apache2/conf/httpd.conf httpd
This example script is not appropriate for production environments. We recommend configuring httpd to use TLS according to your IT policies. Refer to Apache documentation for more information on downloading and configuring Apache httpd.
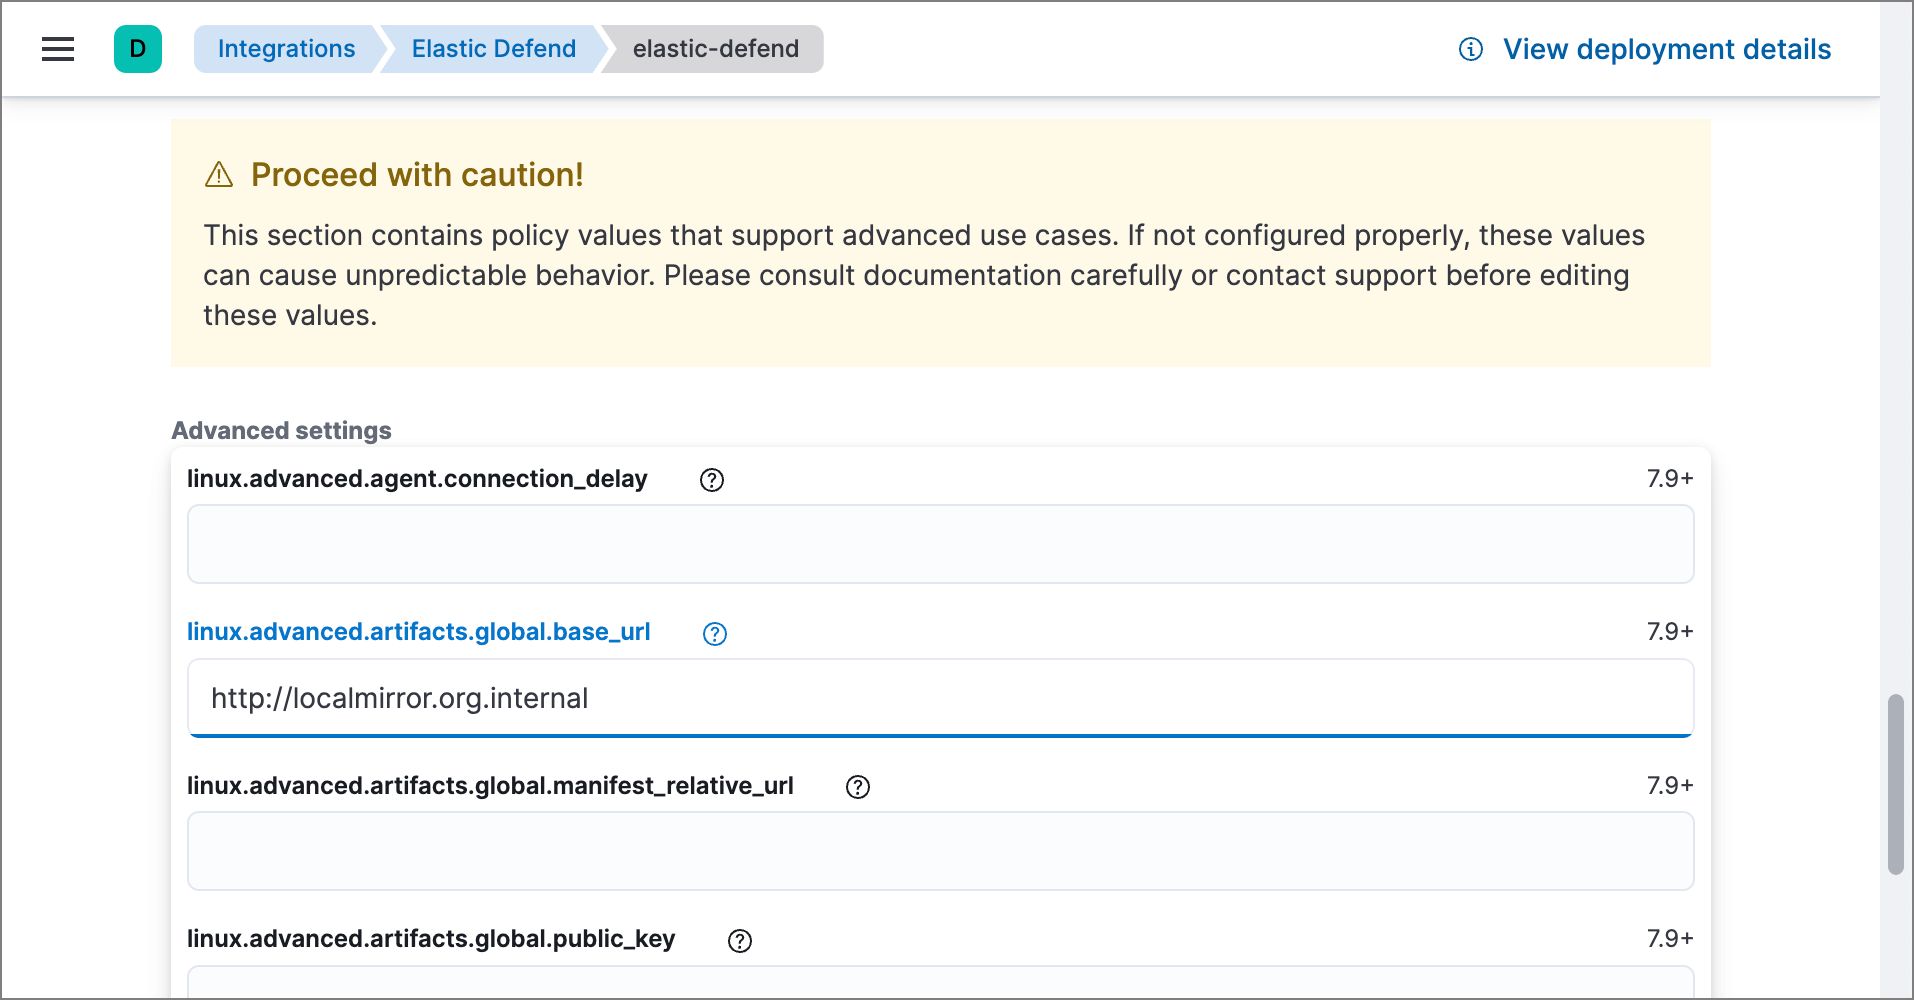
Set the advanced.artifacts.global.base_url advanced setting for each Elastic Defend integration policy that needs to use the mirror. Note that there’s a separate setting for each operating system:
linux.advanced.artifacts.global.base_urlmac.advanced.artifacts.global.base_urlwindows.advanced.artifacts.global.base_url

If Elastic Endpoint needs to operate completely offline in a closed network, you can set up a mirror server and manually update it with new artifact updates regularly.
Complete these steps:
- Deploy an HTTP file server.
- Configure Elastic Endpoint to read from the file server.
- Manually copy artifact updates to the file server.
Deploy an HTTP file server to serve files from a local directory, which will be filled with artifact update files in a later step.
The entity tag (Etag) header is a mandatory HTTP response header that you must set in your server configuration file. Elastic Endpoint uses the Etag header to determine whether your global artifacts have been updated since they were last downloaded. If your server configuration file does not contain an ETag header, Elastic Endpoint won’t download new artifacts when they’re available.
Example: Nginx
This example script starts an Nginx Docker image and configures it as a file server:
cat > nginx.conf << 'EOF'
# set compatible etag format
map $sent_http_etag $elastic_etag {
  "~(.*)-(.*)" "$1$2";
}
server {
  root /app/static;
  location / {
    add_header ETag "$elastic_etag";
  }
}
EOF
docker run -v "$PWD"/nginx.conf:/etc/nginx/conf.d/default.conf:ro -v "$PWD"/static:/app/static:ro -p 80:80 nginx
This example script is not appropriate for production environments. We recommend configuring the Nginx server to use TLS according to your IT policies. Refer to Nginx documentation for more information on downloading and configuring Nginx.
Example: Apache HTTPD
This example script starts an Apache httpd Docker image and configures it as a file server:
docker run --rm httpd cat /usr/local/apache2/conf/httpd.conf > my-httpd.conf
cat >> my-httpd.conf << 'EOF'
# set compatible etag format
FileETag MTime
EOF
docker run -p 80:80 -v "$PWD/static":/usr/local/apache2/htdocs/ -v "$PWD"/my-httpd.conf:/usr/local/apache2/conf/httpd.conf:ro httpd
This example script is not appropriate for production environments. We recommend configuring httpd to use TLS according to your IT policies. Refer to Apache documentation for more information on downloading and configuring Apache httpd.
Set the advanced.artifacts.global.base_url advanced setting for each Elastic Defend integration policy that needs to use the mirror. Note that there’s a separate setting for each operating system:
linux.advanced.artifacts.global.base_urlmac.advanced.artifacts.global.base_urlwindows.advanced.artifacts.global.base_url

Download the most recent artifact files from the Elastic global artifact server, then copy those files to the server instance you created in step 1.
Below is an example script that downloads all the global artifact updates. There are different artifact files for each version of Elastic Endpoint. Change the value of the ENDPOINT_VERSION variable in the example script to match the deployed version of Elastic Endpoint.
export ENDPOINT_VERSION=9.2.2 && wget -P downloads/endpoint/manifest https://artifacts.security.elastic.co/downloads/endpoint/manifest/artifacts-$ENDPOINT_VERSION.zip && zcat -q downloads/endpoint/manifest/artifacts-$ENDPOINT_VERSION.zip | jq -r '.artifacts | to_entries[] | .value.relative_url' | xargs -I@ curl "https://artifacts.security.elastic.co@" --create-dirs -o ".@"
This command will download files and directory structure that should be directly copied to the file server.
Elastic releases updates continuously as detection engines are improved. Therefore, we recommend updating air-gapped environments at least monthly to stay current with artifact updates.
Each new global artifact update release increments a version identifier that you can check to ensure that Elastic Endpoint has received and installed the latest version.
To confirm the latest version of the artifacts for a given Elastic Endpoint version, check the published version. This example script checks the version:
curl -s https://artifacts.security.elastic.co/downloads/endpoint/manifest/artifacts-9.2.2.zip | zcat -q | jq -r .manifest_version
Replace https://artifacts.security.elastic.co in the command above with your local mirror server to validate that the artifacts are served correctly.
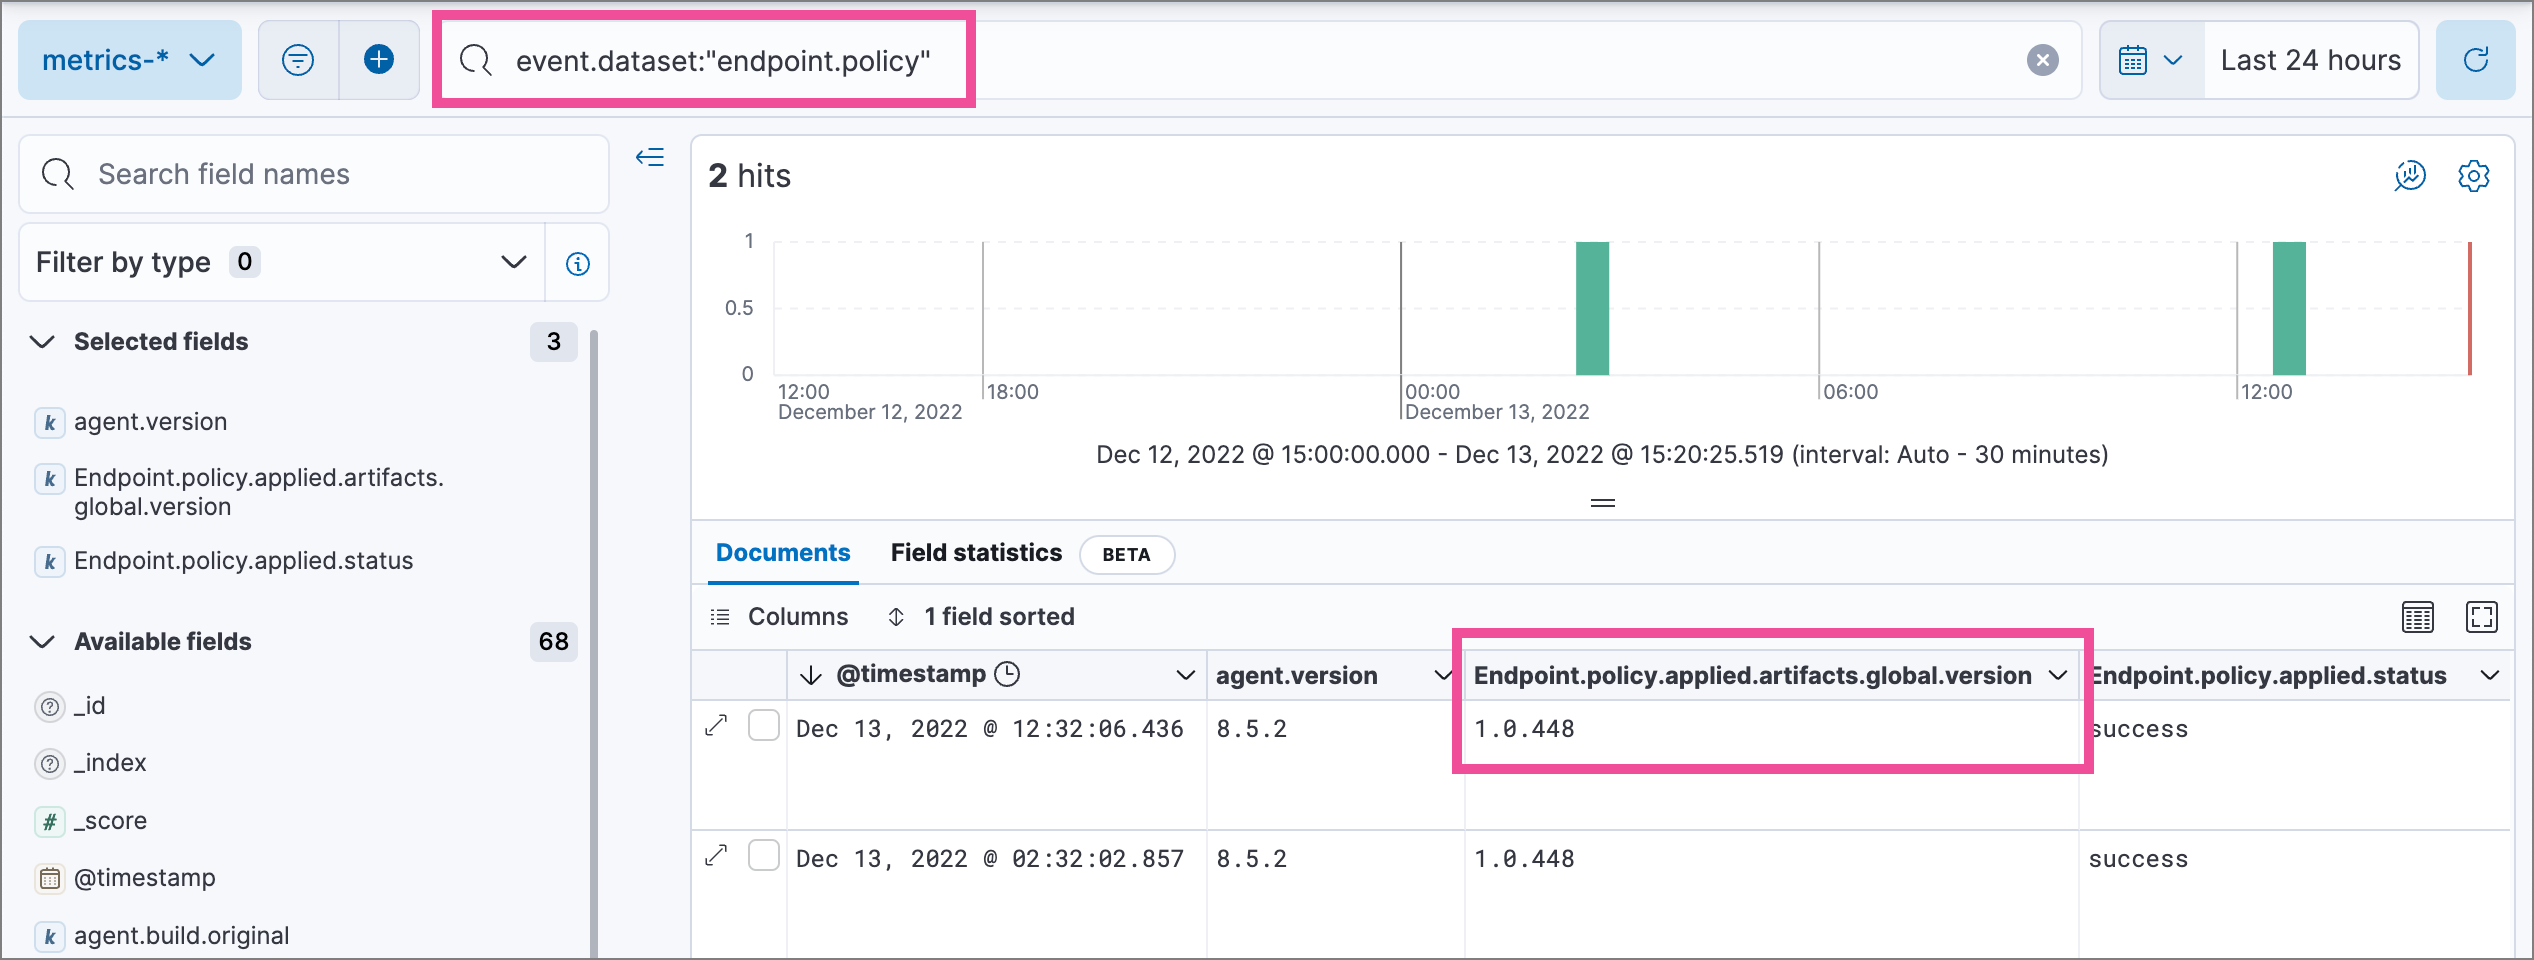
After updating the Elastic Endpoint configuration to read from the mirror server, use Kibana's Discover view to search the metrics-* data view for endpoint.policy response documents, then check the installed version (Endpoint.policy.applied.artifacts.global.version) and compare with the output from the command above:
