Configuration
editConfiguration
editOnce the driver has been installed, in order for an application to be able to connect to Elasticsearch through ODBC, a set of configuration parameters must be provided to the driver. Depending on the application, there are generally three ways of providing these parameters:
- through a connection string;
- using a User DSN or System DSN;
- through a File DSN.
DSN (data source name) is a generic name given to the set of parameters an ODBC driver needs to connect to a database.
We will refer to these parameters as connection parameters or DSN (despite some of these parameters configuring some other aspects of a driver’s functions; e.g. logging, buffer sizes…).
Using a DSN is the most widely used, simplest and safest way of performing the driver configuration. Constructing a connection string, on the other hand, is the most crude way and consequently the least common method.
We will focus on DSN usage only.
1. Launching ODBC Data Source Administrator
editFor DSN management, ODBC provides the ODBC Data Source Administrator application, readily installed on all recent desktop Windows operating systems.
-
The 32-bit version of the Odbcad32.exe file is located in the
%systemdrive%\Windows\SysWoW64folder. -
The 64-bit version of the Odbcad32.exe file is located in the
%systemdrive%\Windows\System32folder.
To launch it, open the search menu - Win + S - and type "ODBC Data Sources (64-bit)" or "ODBC Data Sources (32-bit)" and press Enter:
Launching ODBC Data Source Administrator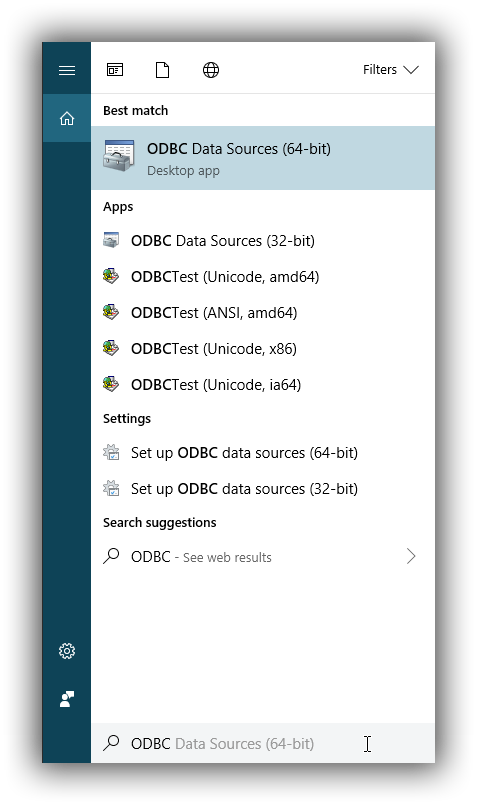
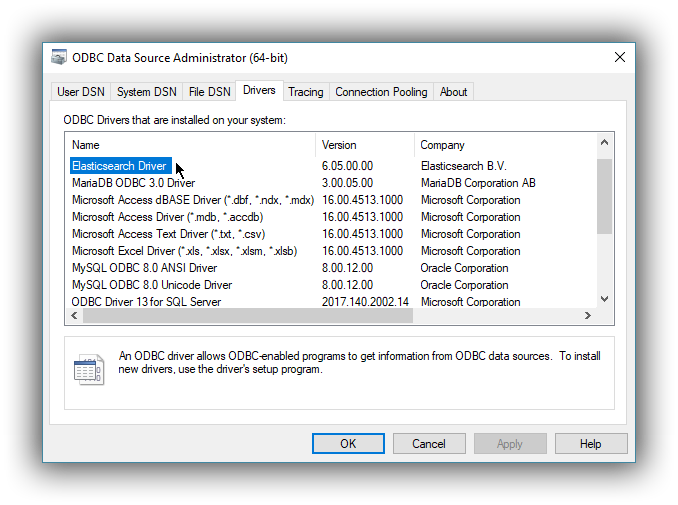
Once launched, you can verify that the driver was installed correctly by clicking on the Drivers tab of the ODBC Data Source Administrator and checking that Elasticsearch Driver is present in the list of installed drivers.
You should also see the version number of the installed driver.
2. Configure a DSN
editThe next step is to configure a DSN. You can choose between the following options mapped on the first three tabs of the Administrator application:
-
User DSN
The connections configured under this tab are only available to the currently logged in user. Each of these DSNs are referred to by a chosen arbitrary name (typically a host or cluster name).
The actual set of parameters making up the DSN is stored through the driver in the system registry. Thus, a user will later only need to provide an application with the DSN name in order to connect to the configured Elasticsearch instance.
-
System DSN
Similar to a User DSN, except that the connections configured under this tab will be available to all the users configured on the system.
-
File DSN
This tab contains functionality that will allow to have one set of connection parameters written into a file, rather then the Registry.
Such a file can be then shared among multiple systems and the user will need to specify the path to it, in order to have the application connect to the configured Elasticsearch instance.
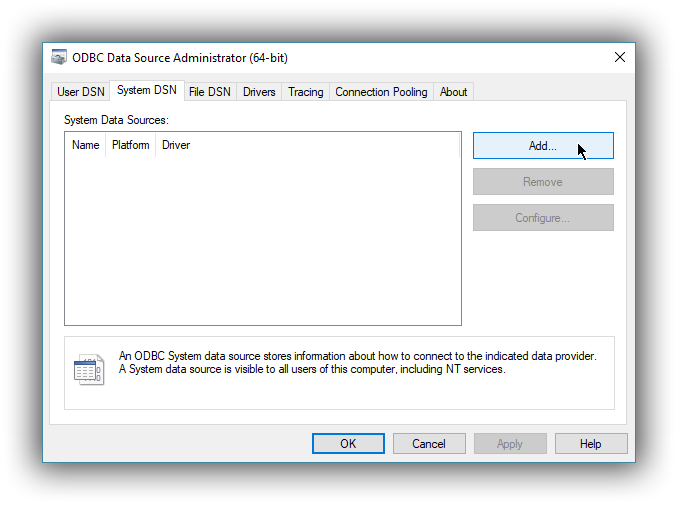
The configuration steps are similar for all the above points. Following is an example of configuring a System DSN.
2.1 Launch Elasticsearch SQL ODBC Driver DSN Editor
editClick on the System DSN tab, then on the Add… button:
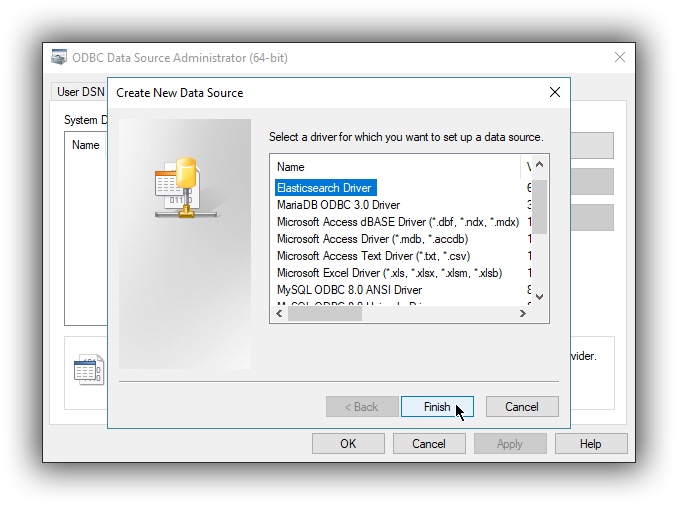
A new window will open, listing all available installed drivers. Click on Elasticsearch Driver, to highlight it, then on the Finish button:
This action closes the previously opened second window and open a new one instead, Elasticsearch SQL ODBC Driver’s DSN Editor:
Elasticsearch SQL ODBC Driver DSN Editor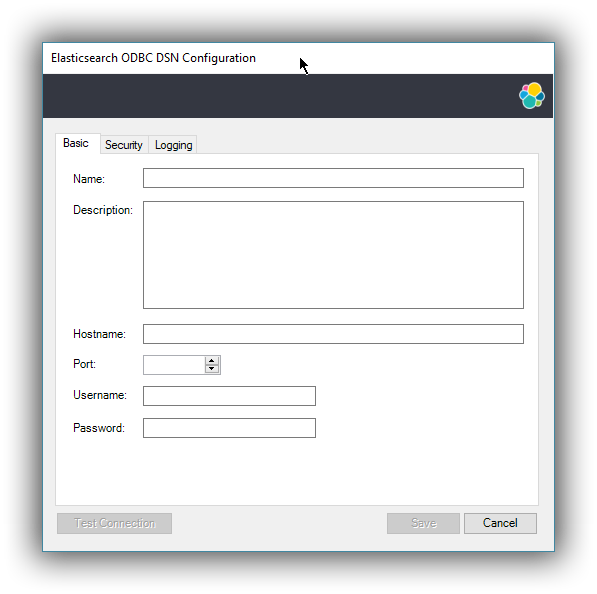
This new window has three tabs, each responsible for a set of configuration parameters, as follows.
2.2 Connection parameters
editThis tab allows configuration for the following items:
-
Name
This is the name the DSN will be referred by.
The characters available for this field are limited to the set permitted for a Registry key.
Example: localhost
-
Description
This field allows a arbitrary text; generally used for short notes about the configured connection.
Example: Clear-text connection to the local [::1]:9200.
-
Hostname
This field requires an IP address or a resolvable DNS name of the Elasticsearch instance that the driver will connect to.
Example: ::1
-
Port
The port on which the Elasticsearch listens on.
If left empty, the default 9200 port number will be used.
-
Username, Password
If security is enabled, these fields will need to contain the credentials of the user configured to access the REST SQL endpoint.
At a minimum, the Name and Hostname fields must be provisioned, before the DSN can be saved.
Connection encryption is enabled by default. This will need to be changed if connecting to a SQL API endpoint with no cryptography enabled.
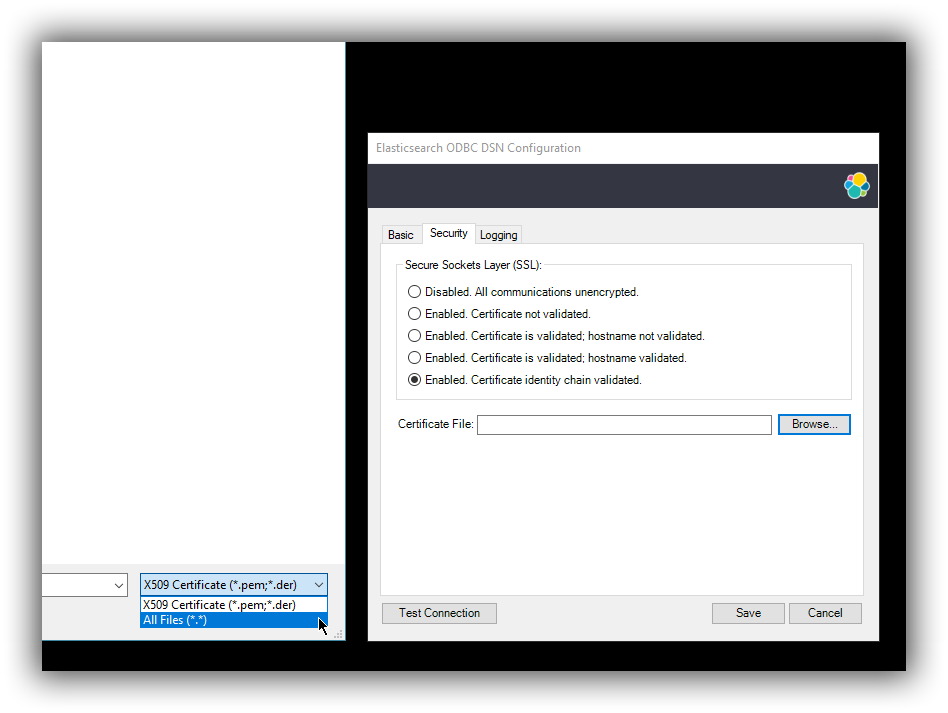
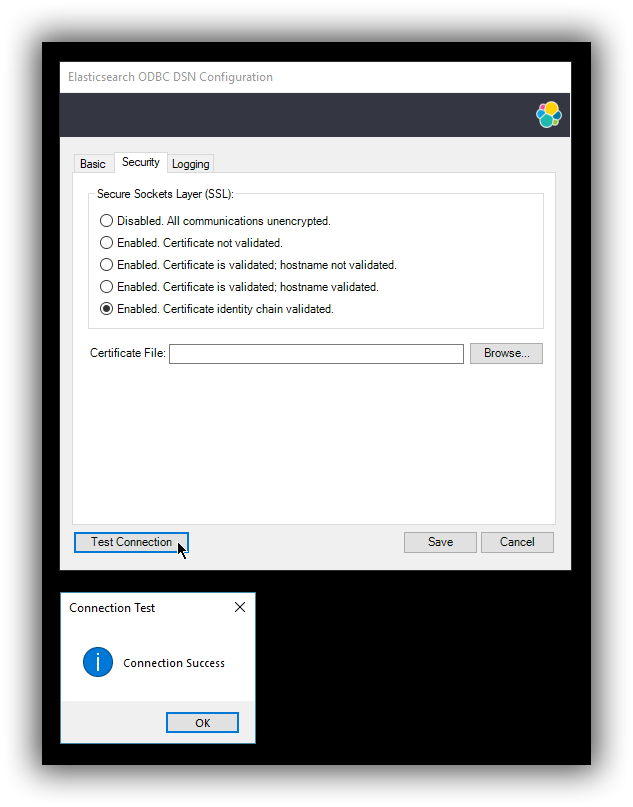
2.3 Cryptography parameters
editOne of the following SSL options can be chosen:
-
Disabled. All communications unencrypted.
The communication between the driver and the Elasticsearch instance is performed over a clear-text connection.
This setting can expose the access credentials to a 3rd party intercepting the network traffic and is not recommended.
-
Enabled. Certificate not validated.
The connection encryption is enabled, but the certificate of the server is not validated.
This is currently the default setting.
This setting allows a 3rd party to act with ease as a man-in-the-middle and thus intercept all communications.
-
Enabled. Certificate is validated; hostname not validated.
The connection encryption is enabled and the driver verifies that server’s certificate is valid, but it does not verify if the certificate is running on the server it was meant for.
This setting allows a 3rd party that had access to server’s certificate to act as a man-in-the-middle and thus intercept all the communications.
-
Enabled. Certificate is validated; hostname validated.
The connection encryption is enabled and the driver verifies that both the certificate is valid, as well as that it is being deployed on the server that the certificate was meant for.
-
Enabled. Certificate identity chain validated.
This setting is equivalent to the previous one, with one additional check against certificate’s revocation. This offers the strongest security option and is the recommended setting for production deployments.
-
Certificate File
In case the server uses a certificate that is not part of the PKI, for example using a self-signed certificate, you can configure the path to a X.509 certificate file that will be used by the driver to validate server’s offered certificate.
The driver will only read the contents of the file just before a connection is attempted. See 2.5 Testing the connection section further on how to check the validity of the provided parameters.
If using the file browser to locate the certificate - by pressing the Browse… button - only files with .pem and .der extensions will be considered by default. Choose All Files (*.*) from the drop down, if your file ends with a different extension:
2.4 Logging parameters
editFor troubleshooting purposes, the Elasticsearch SQL ODBC Driver offers functionality to log the API calls that an application makes; this is enabled in the Administrator application:
Enable Application ODBC API logging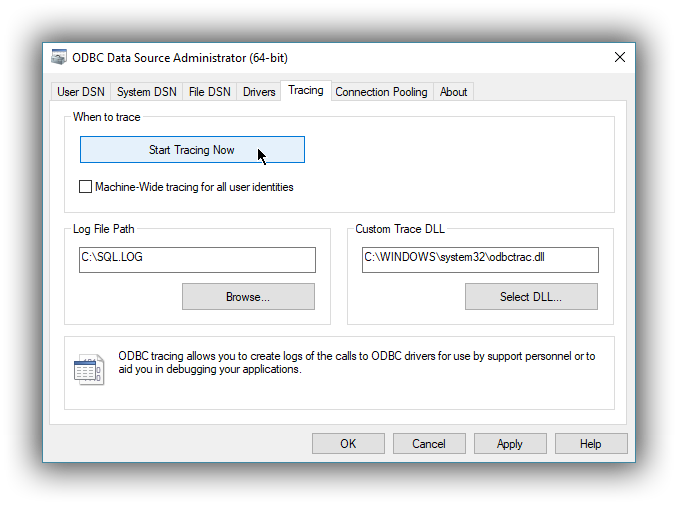
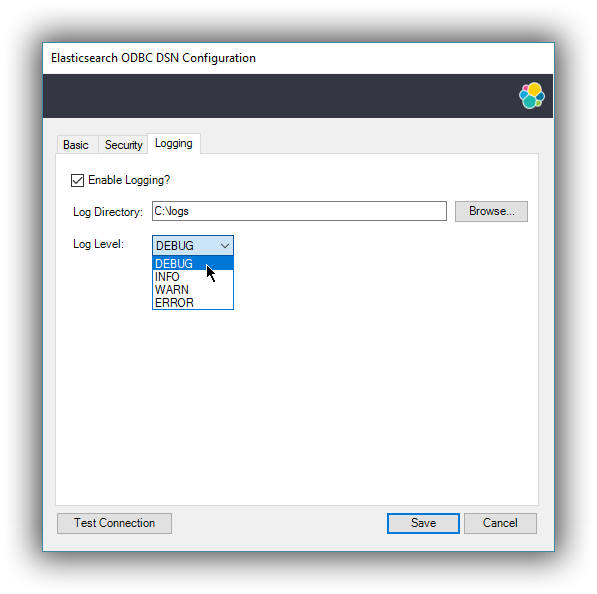
However, this only logs the ODBC API calls made by the application into the Driver Manager and not those made by the Driver Manager into the driver itself. To enable logging of the calls that the driver receives, as well as internal driver processing events, you can enable driver’s logging on Editor’s Logging tab:
-
Enable Logging?
Ticking this will enable driver’s logging. A logging directory is also mandatory when this option is enabled (see the next option). However the specified logging directory will be saved in the DSN if provided, even if logging is disabled.
-
Log Directory
Here is to specify which directory to write the log files in.
The driver will create one log file per connection, for those connections that generate logging messages.
-
Log Level
Configure the verbosity of the logs.
When authentication is enabled, the password will be redacted from the logs.
Debug-logging can quickly lead to the creation of many very large files and generate significant processing overhead. Only enable if instructed so and preferably only when fetching low volumes of data.
2.5 Testing the connection
editOnce the Hostname, the Port (if different from implicit default) and the SSL options are configured, you can test if the provided parameters are correct by pressing the Test Connection button. This will instruct the driver to connect to the Elasticsearch instance and perform a simple SQL test query. (This will thus require a running Elasticsearch instance with the SQL plugin enabled.)
When connection testing, all the configured parameters are taken into account, including the logging configuration. This will allow early detection of potential file/directory access rights conflicts.
See Alternative logging configuration section further for an alternative way of configuring the logging.
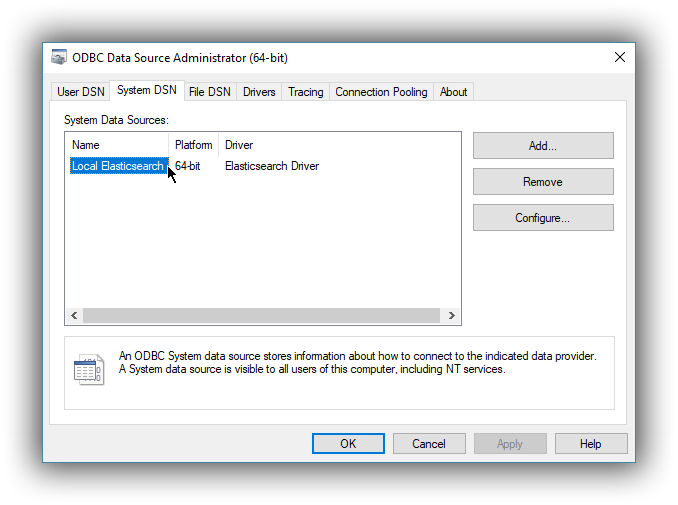
3. DSN is available
editOnce everything is in place, pressing the Save button will store the configuration into the chosen destination (Registry or file).
Before saving a DSN configuration the provided file/directory paths are verified to be valid on the current system. The DSN editor will however not verify in any way the validity or reachability of the configured Hostname : Port. See 2.5 Testing the connection for an exhaustive check.
If everything is correct, the name of the newly created DSN will be listed as available to use:
Alternative logging configuration
editDue to the specification of the ODBC API, the driver will receive the configured DSN parameters - including the logging ones - only once a connection API is invoked (such as SQLConnect or SQLDriverConnect). The Driver Manager will however always make a set of API calls into the driver before attempting to establish a connection. To capture those calls as well, one needs to pass logging configuration parameters in an alternative way. The Elasticsearch SQL ODBC Driver will use an environment variable for this purpose.
Configuring an environment variable is OS specific and not detailed in this guide. Whether the variable should be configured system-wide or user-specific depends on the way the ODBC-enabled application is being run and if logging should affect the current user only or not.
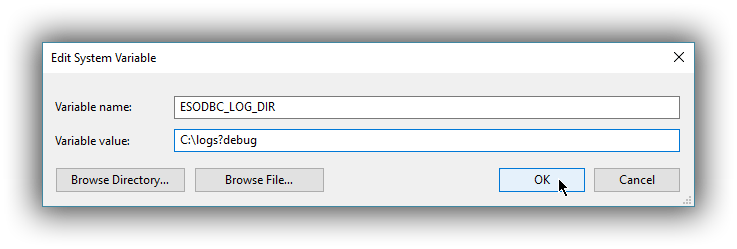
The definition of the environment variable needs to be done as follows:
- Name: ESODBC_LOG_DIR
-
Value: [path](?[level]), where:
[path] is the path to the directory where the log files will be written into;
[level] is optional and can take one of the following values: debug, info, warn, error; if not provided, debug is assumed.
When enabling the logging through the environment variable, the driver will create one log file per process.
Both ways of configuring the logging can coexist and both can use the same destination logging directory. However, one logging message will only be logged once, the connection logging taking precedence over the environment variable logging.