Disable an Elasticsearch data tier
editDisable an Elasticsearch data tier
editThe process of disabling a data tier depends on whether we are dealing with searchable snapshots or regular indices.
The hot and warm tiers store regular indices, while the frozen tier stores searchable snapshots. However, the cold tier can store either regular indices or searchable snapshots. To check if a cold tier contains searchable snapshots perform the following request:
GET /_cat/indices/restored-*
Non-searchable snapshot data tier
editElastic Cloud Enterprise tries to move all data from the nodes that are removed during plan changes. To disable a non-searchable snapshot data tier (e.g., hot, warm, or cold tier), make sure that all data on that tier can be re-allocated by reconfiguring the relevant shard allocation filters. You’ll also need to temporarily stop your index lifecycle management (ILM) policies to prevent new indices from being moved to the data tier you want to disable.
To learn more about ILM for Elastic Cloud Enterprise, or shard allocation filtering, check the following documentation:
To make sure that all data can be migrated from the data tier you want to disable, follow these steps:
-
Determine which nodes will be removed from the cluster.
- Log into the Cloud UI.
-
From the Deployments page, select your deployment.
Narrow the list by name, ID, or choose from several other filters. To further define the list, use a combination of filters.
-
Filter the list of instances by the Data tier you want to disable.
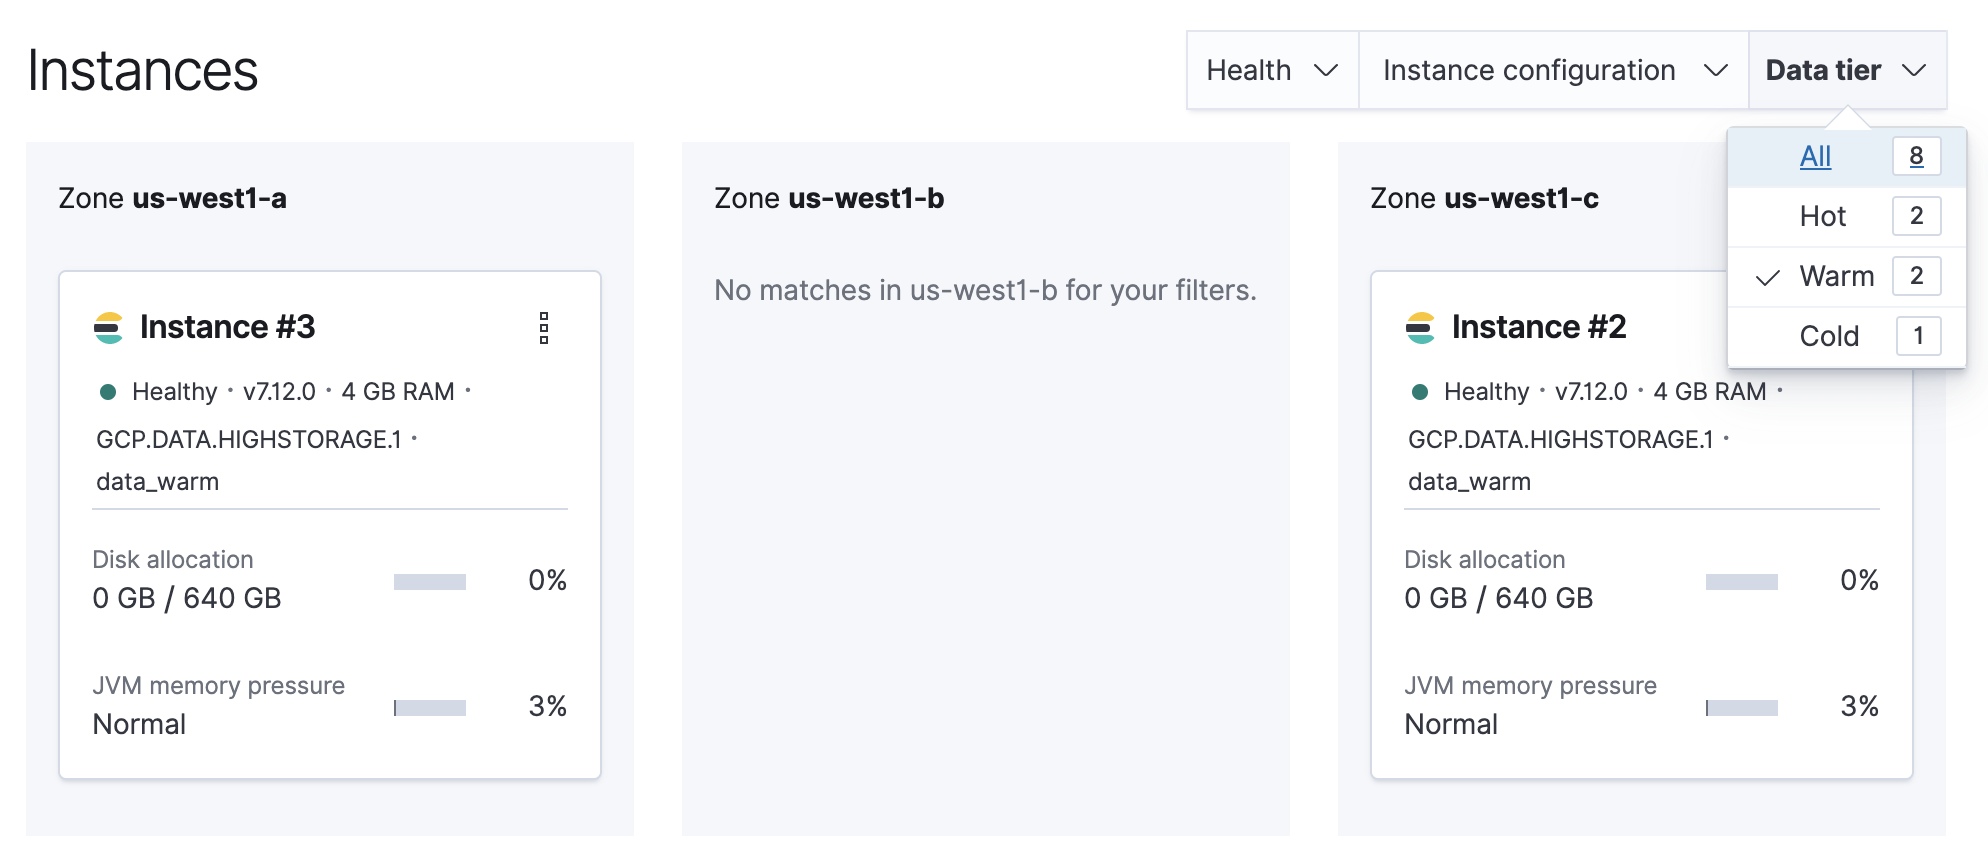
Note the listed instance IDs. In this example, it would be Instance 2 and Instance 3.
-
Stop ILM.
POST /_ilm/stop
-
Determine which shards need to be moved.
GET /_cat/shards
Parse the output, looking for shards allocated to the nodes to be removed from the cluster. Note that
Instance #2is shown asinstance-0000000002in the output.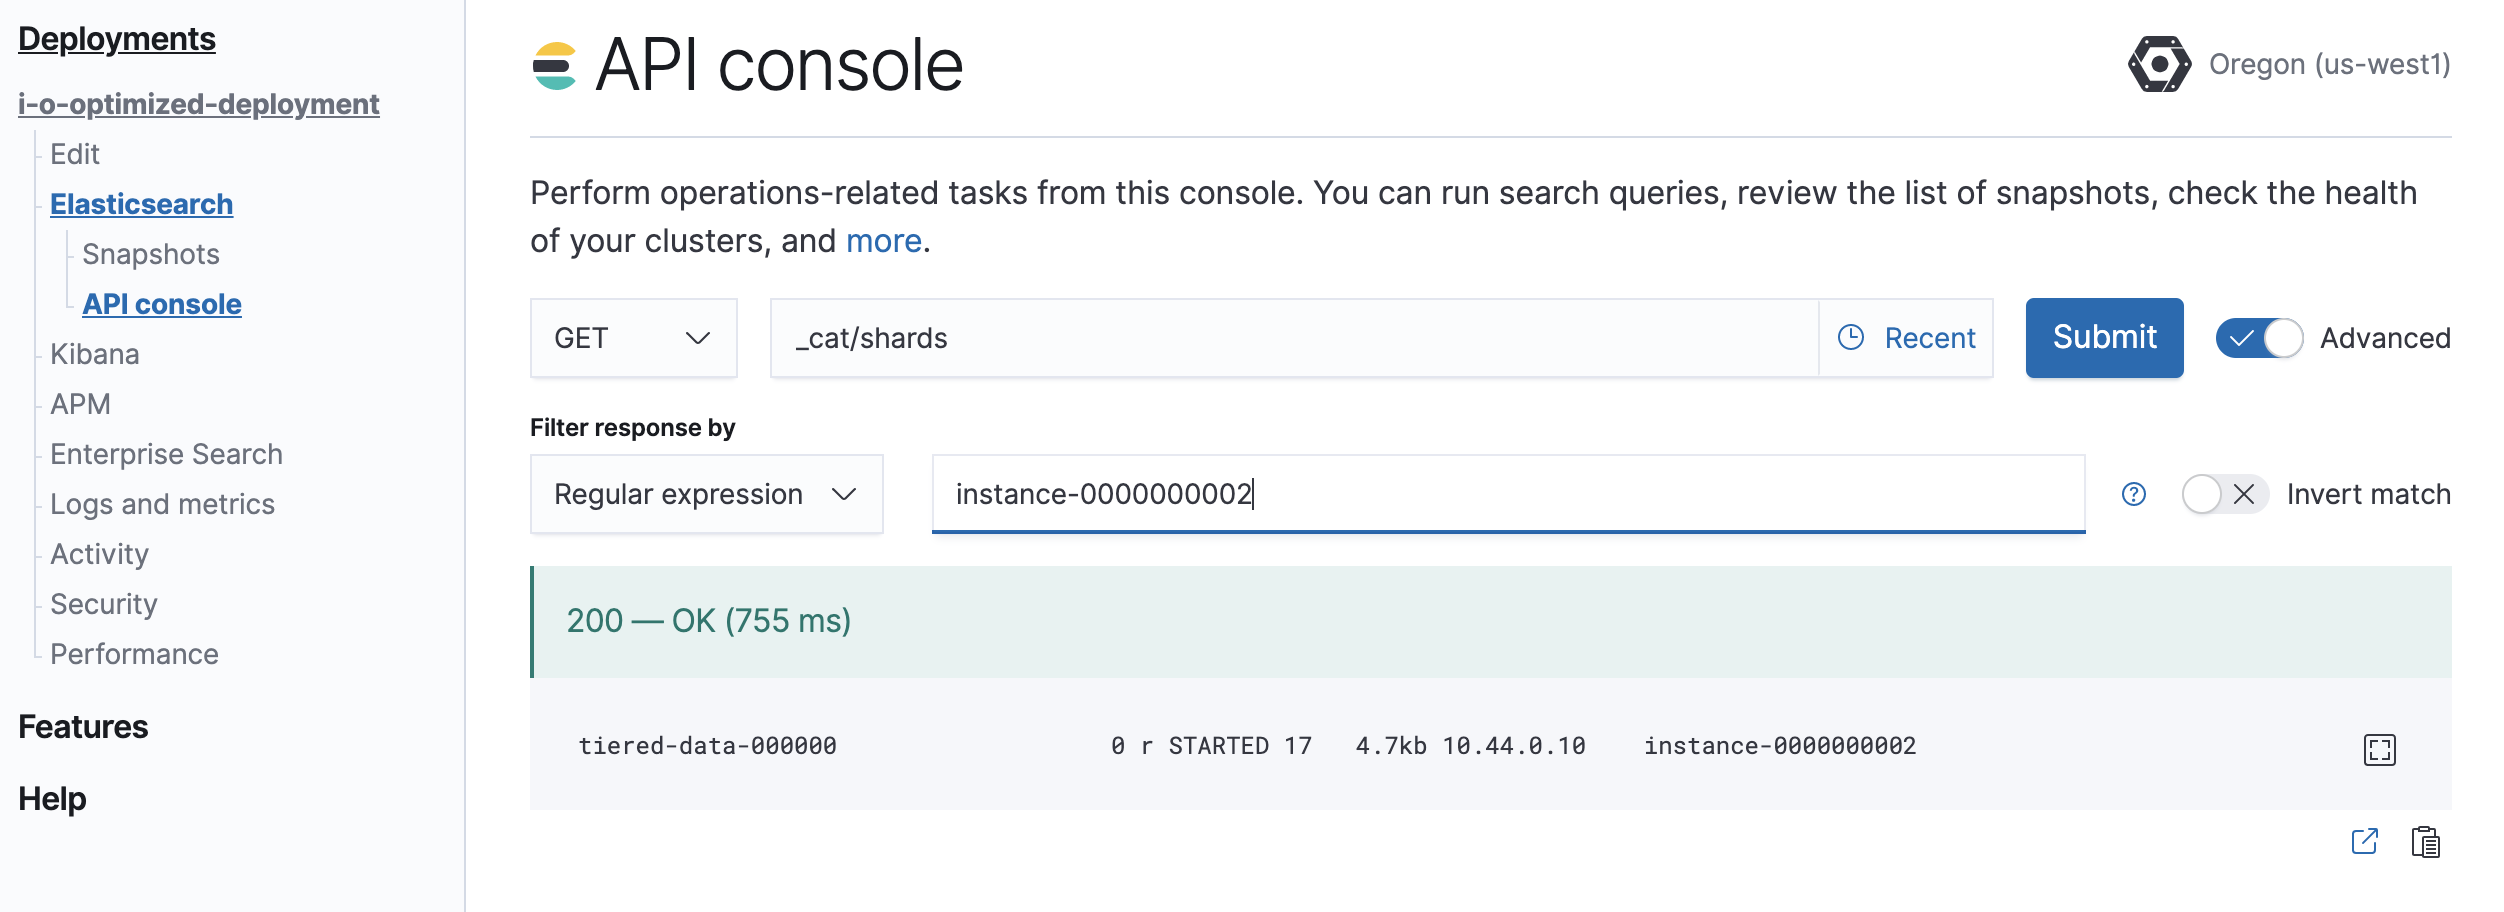
-
Move shards off the nodes to be removed from the cluster.
You must remove any index-level shard allocation filters from the indices on the nodes to be removed. ILM uses different rules depending on the policy and version of Elasticsearch. Check the index settings to determine which rule to use:
GET /my-index/_settings
-
Updating data tier based allocation inclusion rules.
Data tier based ILM policies use
index.routing.allocation.includeto allocate shards to the appropriate tier. The indices that use this method have index routing settings similar to the following example:{ ... "routing": { "allocation": { "include": { "_tier_preference": "data_warm,data_hot" } } } ... }You must remove the relevant tier from the inclusion rules. For example, to disable the warm tier, the
data_warmtier preference should be removed:PUT /my-index/_settings { "routing": { "allocation": { "include": { "_tier_preference": "data_hot" } } } }Updating allocation inclusion rules will trigger a shard re-allocation, moving the shards from the nodes to be removed.
-
Updating node attribute allocation requirement rules.
Node attribute based ILM policies uses
index.routing.allocation.requireto allocate shards to the appropriate nodes. The indices that use this method have index routing settings that are similar to the following example:{ ... "routing": { "allocation": { "require": { "data": "warm" } } } ... }You must either remove or redefine the routing requirements. To remove the attribute requirements, use the following code:
PUT /my-index/_settings
{
    "routing": {
      "allocation": {
        "require": {
            "data": null
        }
      }
    }
}
Removing required attributes does not trigger a shard reallocation. These shards are moved when applying the plan to disable the data tier. Alternatively, you can use the cluster re-route API to manually re-allocate the shards before removing the nodes, or explicitly re-allocate shards to hot nodes by using the following code:
PUT /my-index/_settings { "routing": { "allocation": { "require": { "data": "hot" } } } } -
Removing custom allocation rules.
If indices on nodes to be removed have shard allocation rules of other forms, they must be removed as shown in the following example:
PUT /my-index/_settings
{
    "routing": {
      "allocation": {
        "require": null,
        "include": null,
        "exclude": null
      }
    }
}
-
-
Edit the deployment, disabling the data tier.
If autoscaling is enabled, set the maximum size to 0 for the data tier to ensure autoscaling does not re-enable the data tier.
Any remaining shards on the tier being disabled are re-allocated across the remaining cluster nodes while applying the plan to disable the data tier. Monitor shard allocation during the data migration phase to ensure all allocation rules have been correctly updated. If the plan fails to migrate data away from the data tier, then re-examine the allocation rules for the indices remaining on that data tier.
Searchable snapshot data tier
editWhen data reaches the cold or frozen phases, it is automatically converted to a searchable snapshot by ILM.
If you do not intend to delete this data, you should manually restore each of the searchable snapshot indices to a regular index before disabling the data tier, by following these steps:
-
Stop ILM and check ILM status is
STOPPEDto prevent data from migrating to the phase you intend to disable while you are working through the next steps.# stop ILM POST _ilm/stop # check status GET _ilm/status
-
Capture a comprehensive list of index and searchable snapshot names.
-
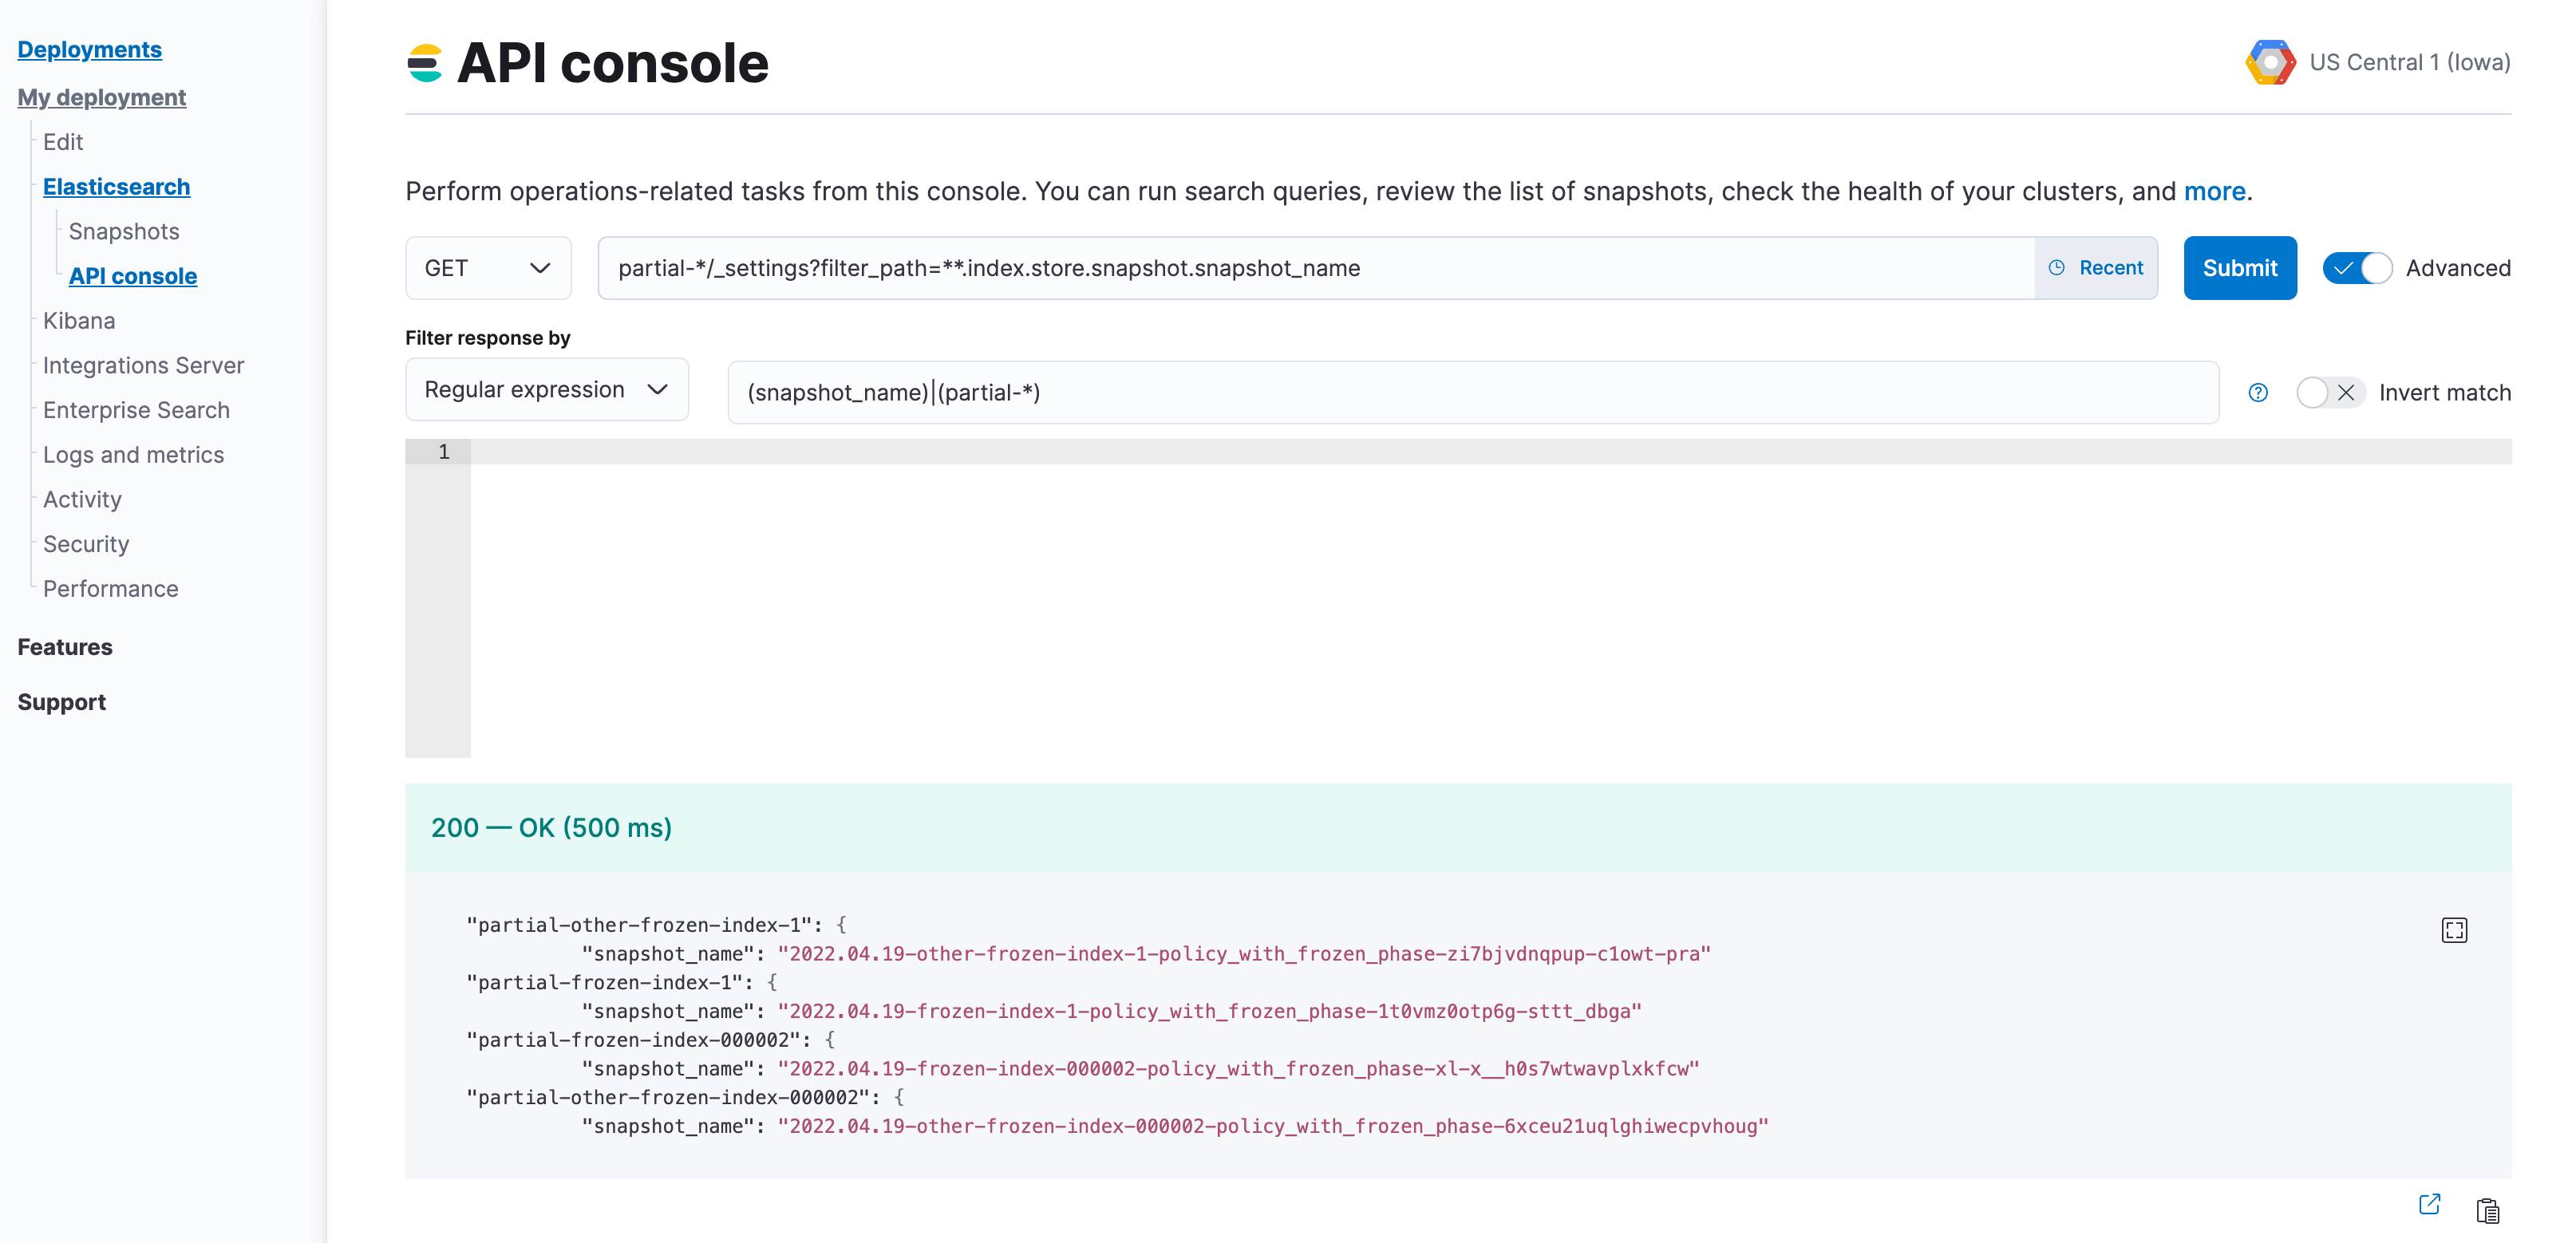
The index name of the searchable snapshots may differ based on the data tier. If you intend to disable the cold tier, then perform the following request with the
restored-*prefix. If the frozen tier is the one to be disabled, use thepartial-*prefix.GET <searchable-snapshot-index-prefix>/_settings?filter_path=**.index.store.snapshot.snapshot_name&expand_wildcards=all
In the example we have a list of 4 indices, which need to be moved away from the frozen tier.
-
- (Optional) Save the list of index and snapshot names in a text file, so you can access it throughout the rest of the process.
-
Remove the aliases that were applied to searchable snapshots indices. Use the index prefix from step 2.
POST _aliases
{
  "actions": [
    {
      "remove": {
        "index": "<searchable-snapshot-index-prefix>-<index_name>",
        "alias": "<index_name>"
      }
    }
  ]
}
If you use data stream, you can skip this step.
In the example we are removing the alias for the
frozen-index-1index.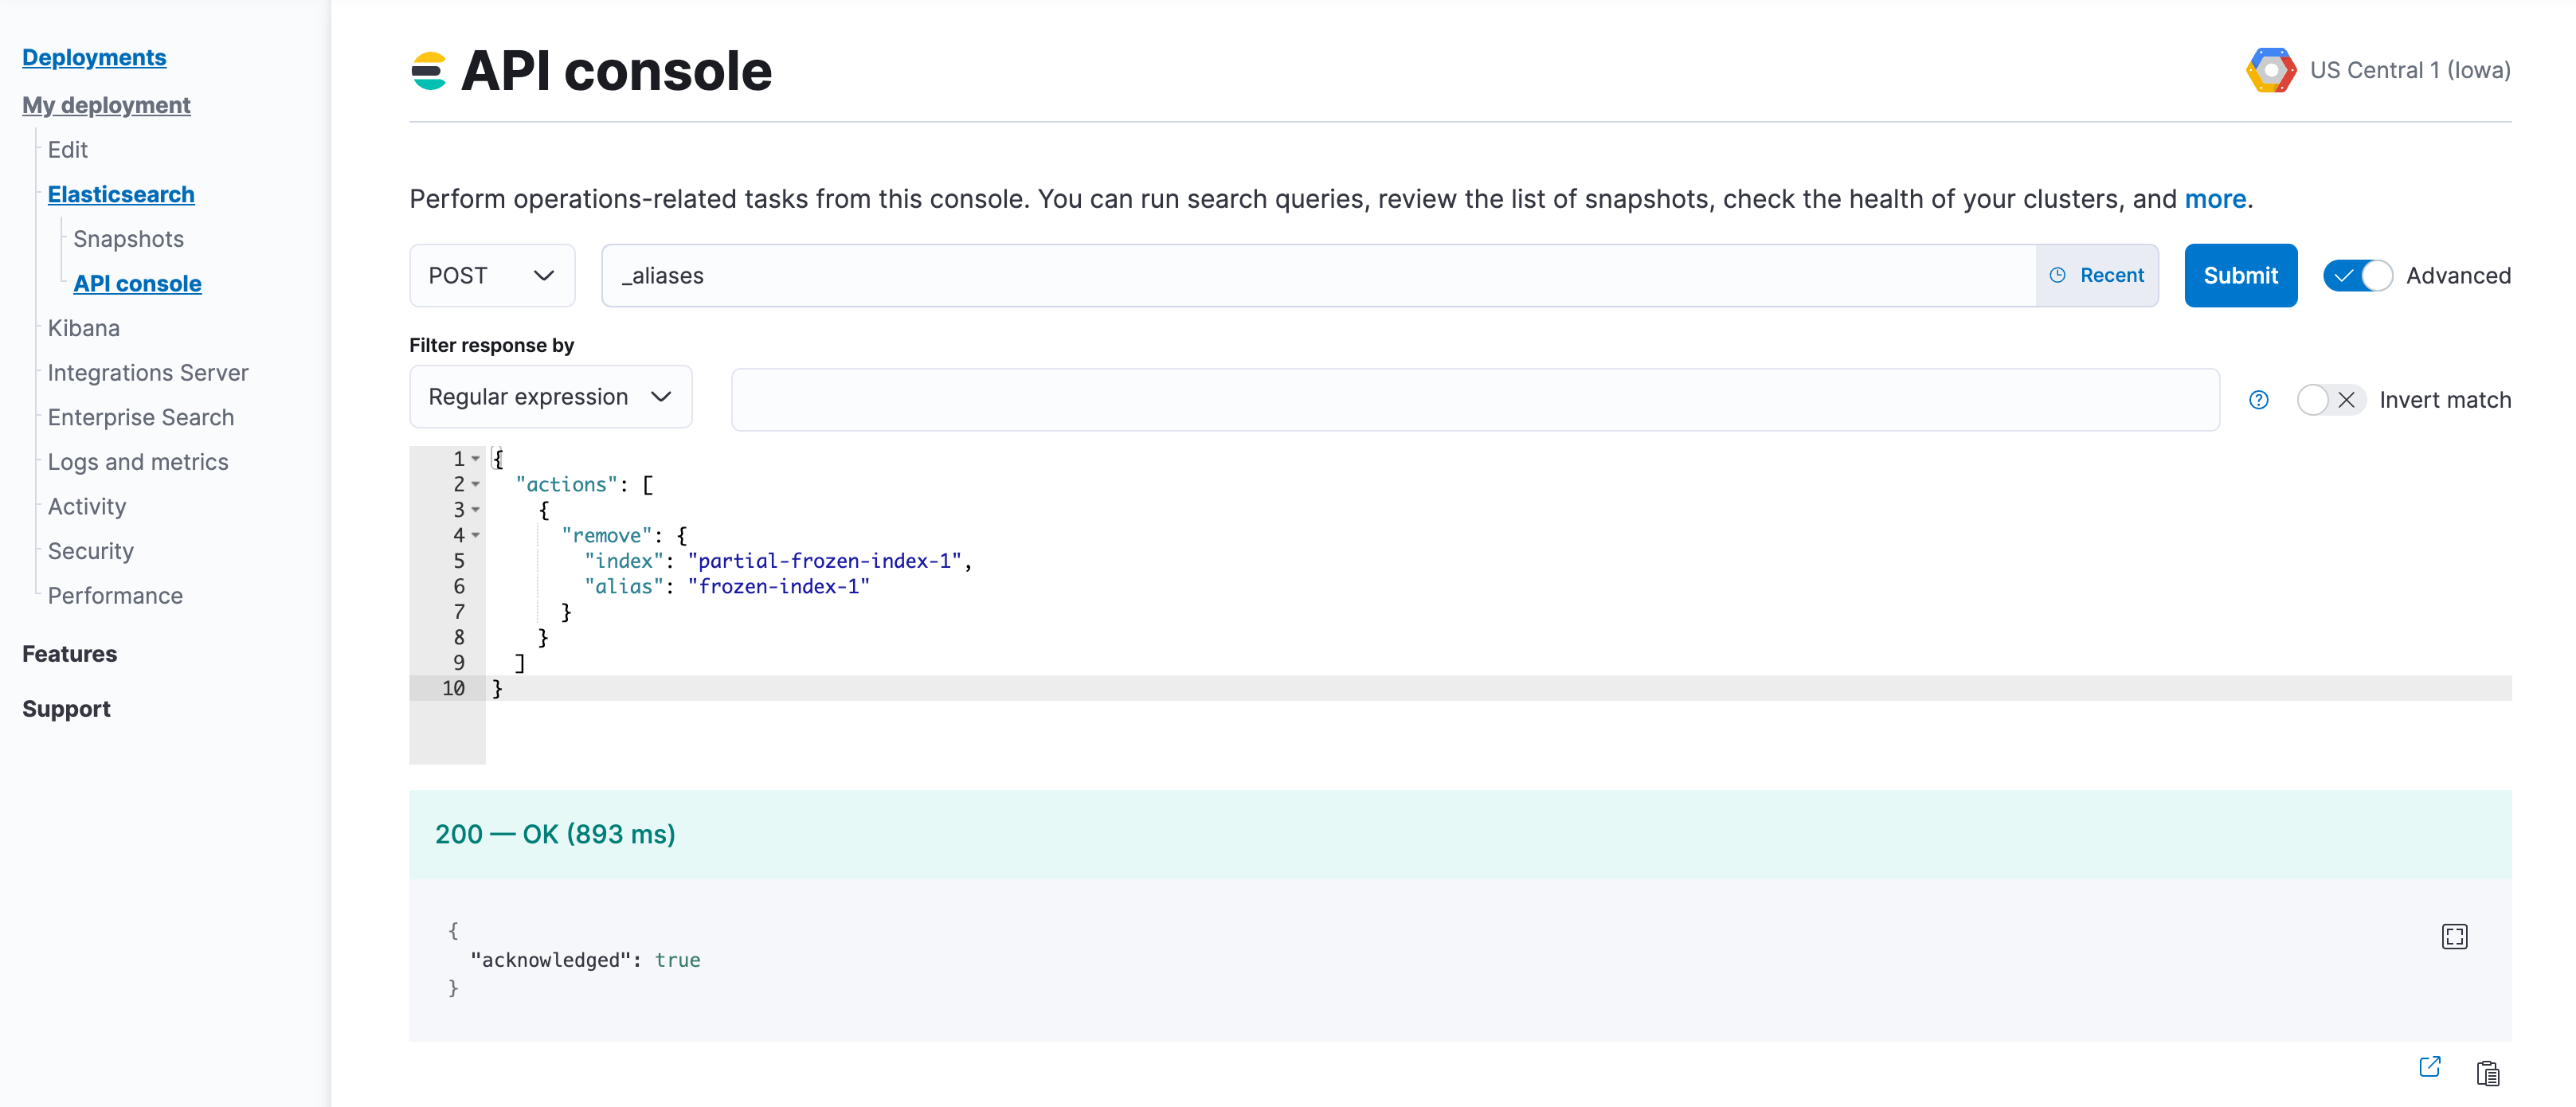
-
Restore indices from the searchable snapshots.
- Follow the steps to specify the data tier based allocation inclusion rules.
-
Remove the associated ILM policy (set it to
null). If you want to apply a different ILM policy, follow the steps to Switch lifecycle policies. -
If needed, specify the alias for rollover, otherwise set it to
null. -
Optionally, specify the desired number of replica shards.
POST _snapshot/found-snapshots/<searchable_snapshot_name>/_restore
{
  "indices": "*",
  "index_settings": {
    "index.routing.allocation.include._tier_preference": "<data_tiers>",
    "number_of_replicas": X,
    "index.lifecycle.name": "<new-policy-name>",
    "index.lifecycle.rollover_alias": "<alias-for-rollover>"
  }
}
The
<searchable_snapshot_name>refers to the above-mentioned step: "Capture a comprehensive list of index and searchable snapshot names".In the example we are restoring
frozen-index-1from the snapshot infound-snapshots(default snapshot repository) and placing it in the warm tier.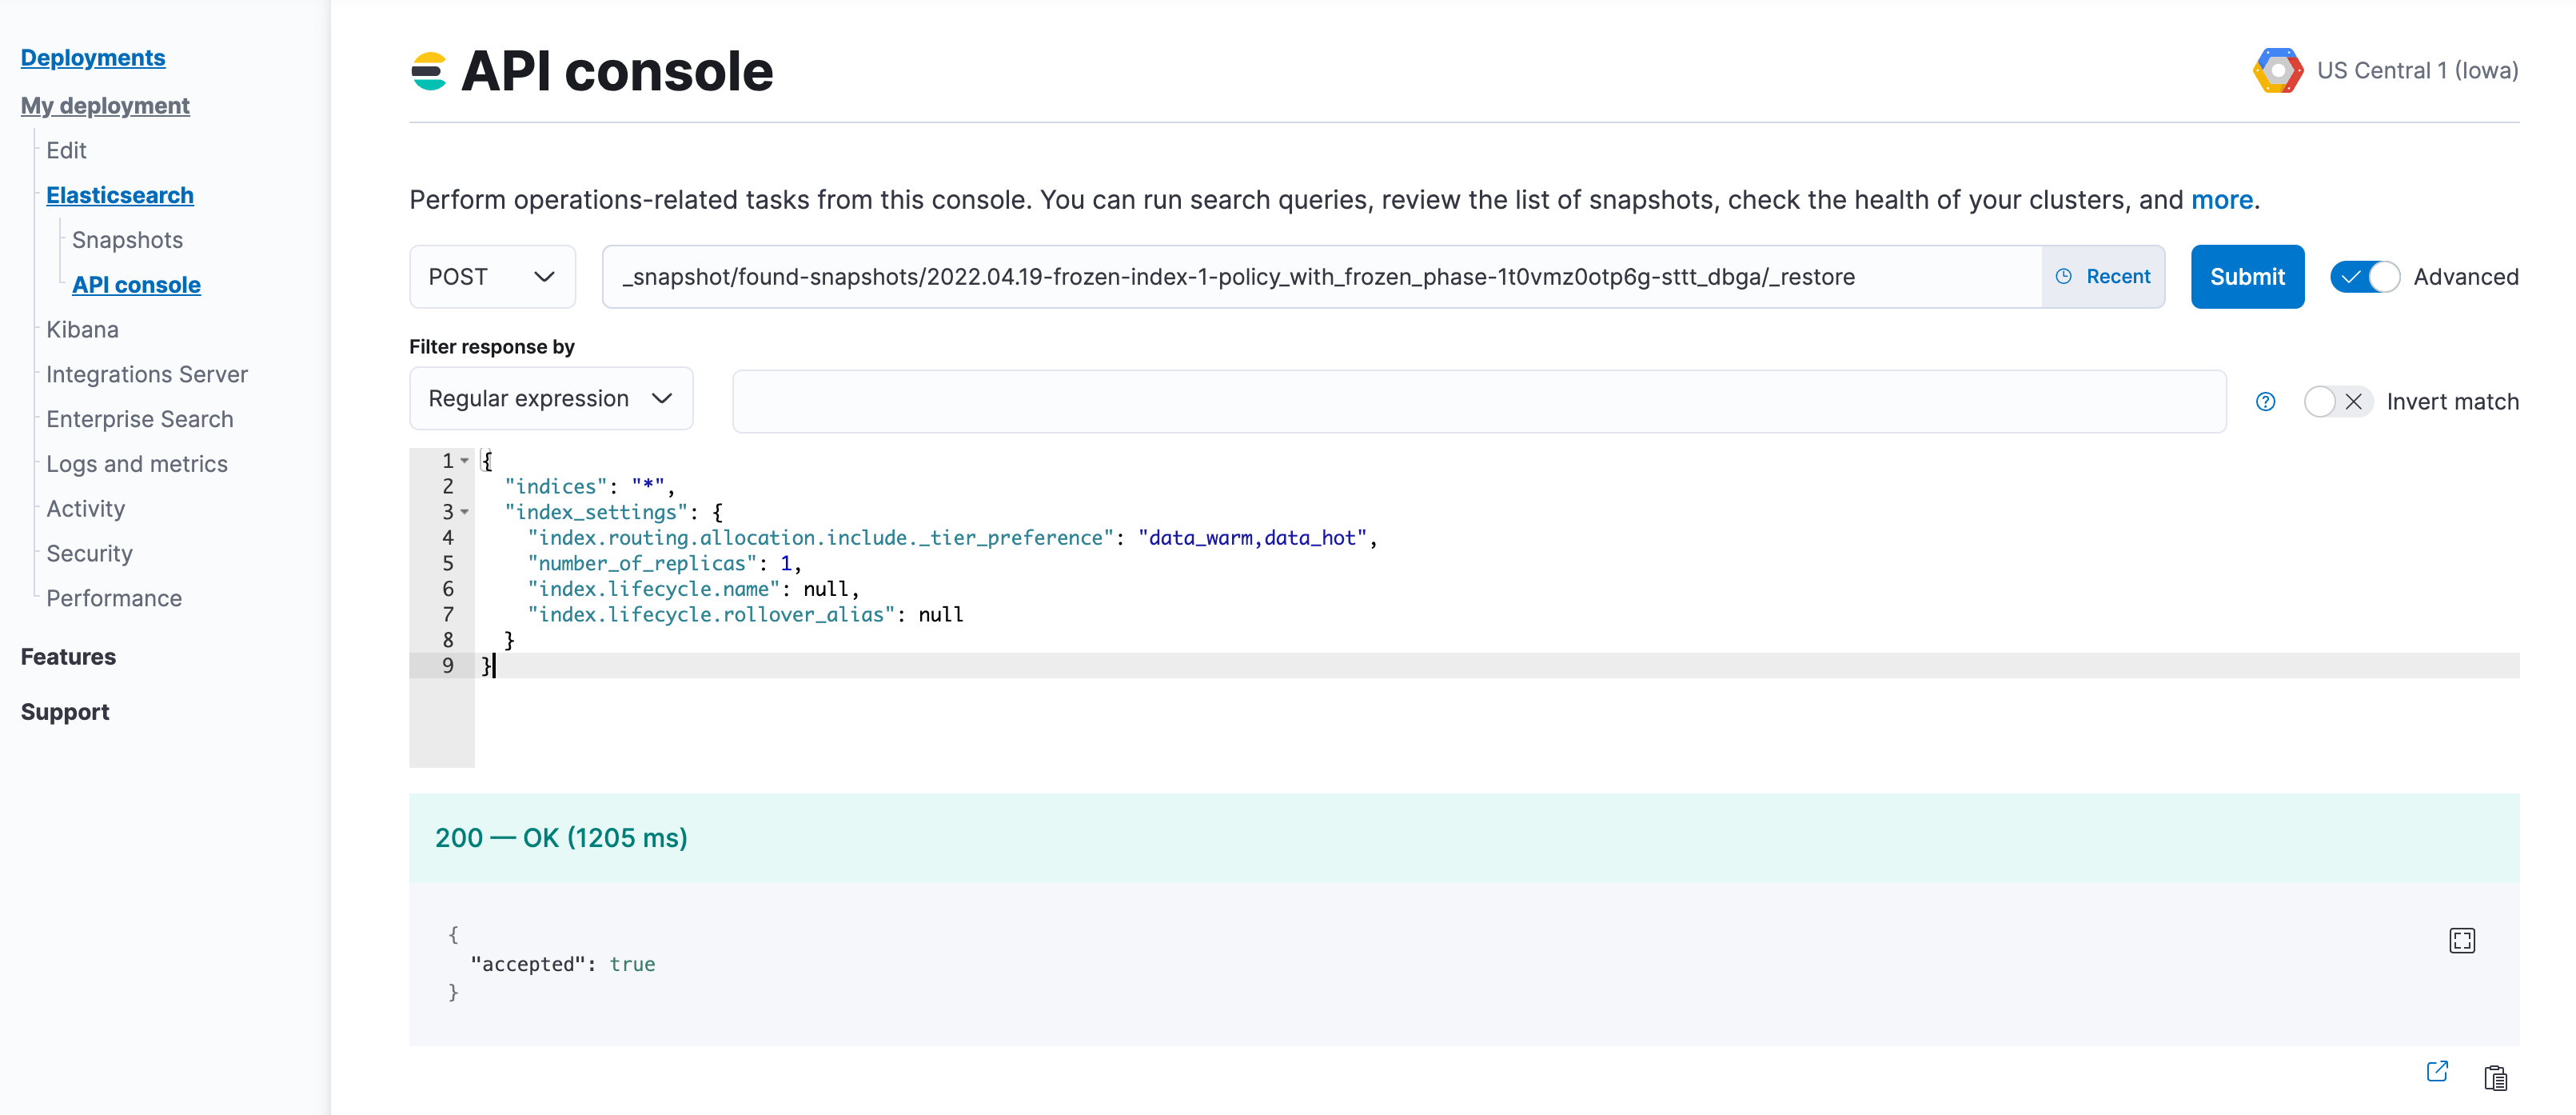
- Repeat steps 4 and 5 until all snapshots are restored to regular indices.
-
Once all snapshots are restored, use
GET _cat/indices/<index-pattern>?v=trueto check that the restored indices aregreenand are correctly reflecting the expecteddocandstore.sizecounts.If you are using data stream, you may need to use
GET _data_stream/<data-stream-name>to get the list of the backing indices, and then specify them by usingGET _cat/indices/<backing-index-name>?v=trueto check. -
Once your data has completed restoration from searchable snapshots to the target data tier,
DELETEsearchable snapshot indices using the prefix from step 2.DELETE <searchable-snapshot-index-prefix>-<index_name>
-
Delete the searchable snapshots by following these steps:
-
Open Kibana and navigate to Management > Data > Snapshot and Restore > Snapshots (or go to
<kibana-endpoint>/app/management/data/snapshot_restore/snapshots) -
Search for
*<ilm-policy-name>* -
Bulk select the snapshots and delete them
In the example we are deleting the snapshots associated with the
policy_with_frozen_phase.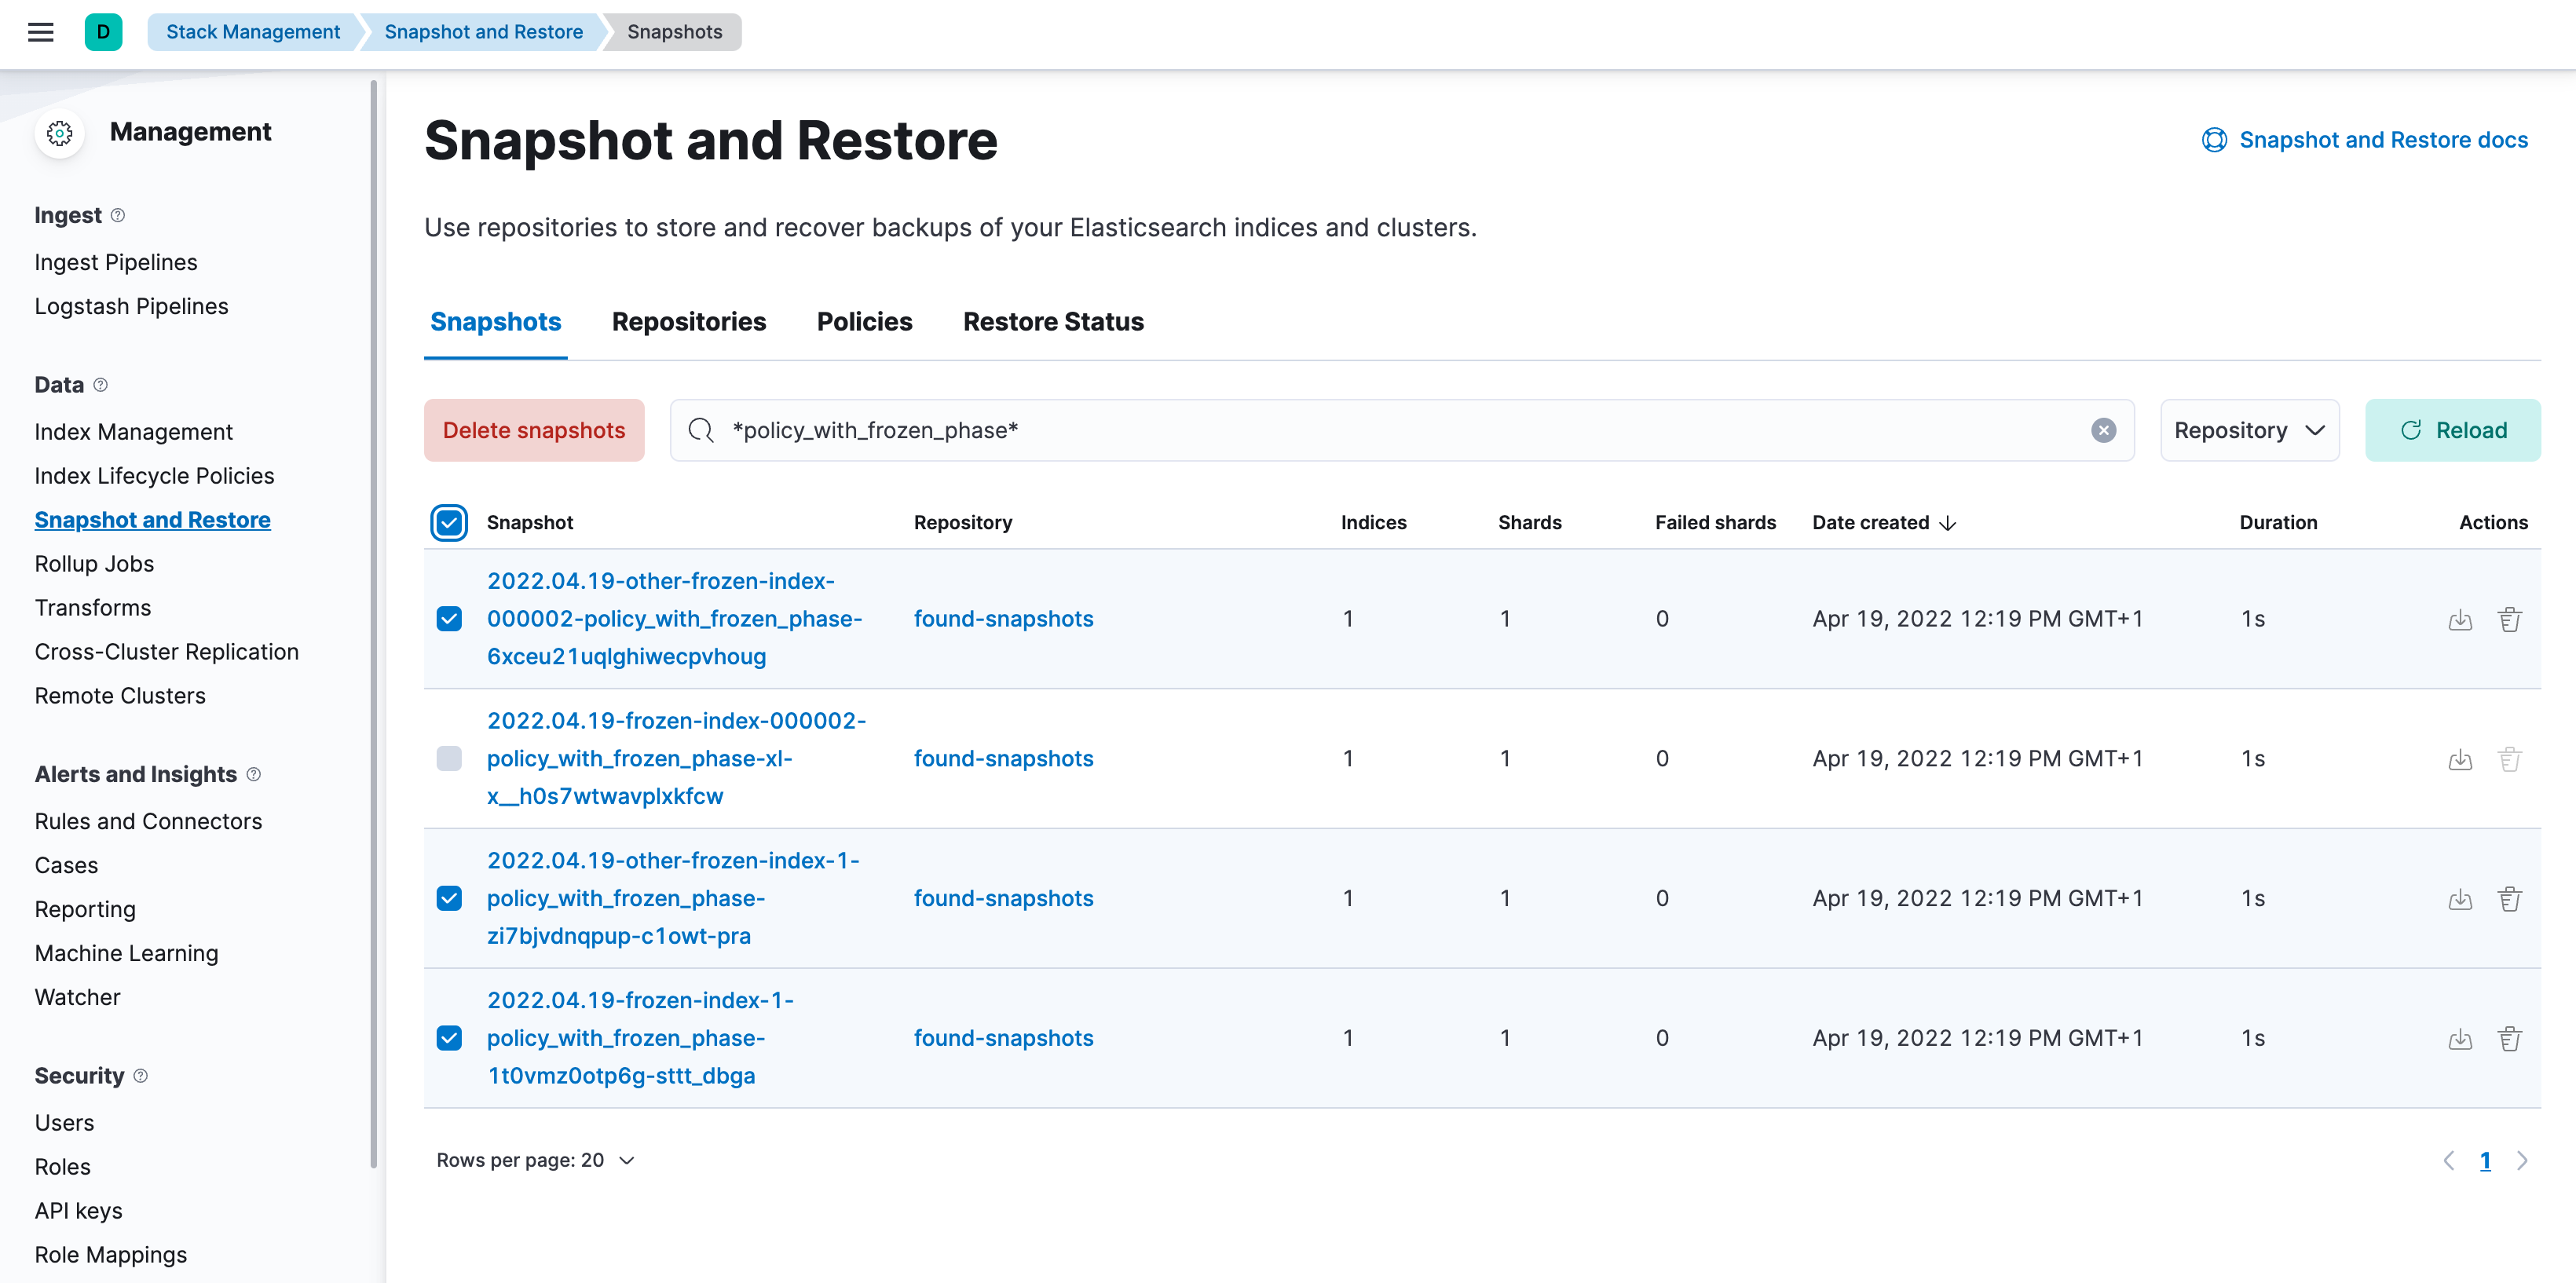
-
Open Kibana and navigate to Management > Data > Snapshot and Restore > Snapshots (or go to
-
Confirm that no shards remain on the data nodes you wish to remove using
GET _cat/allocation?v=true&s=node. - Edit your cluster from the console to disable the data tier.
-
Once the plan change completes, confirm that there are no remaining nodes associated with the disabled tier and that
GET _cluster/healthreportsgreen. If this is the case, re-enable ILM.POST _ilm/start