Install Elasticsearch with .zip on Windows
editInstall Elasticsearch with .zip on Windows
editElasticsearch can be installed on Windows using the Windows .zip archive. This
comes with a elasticsearch-service.bat command which will setup Elasticsearch to run as a
service.
Elasticsearch has historically been installed on Windows using the .zip archive.
An MSI installer package is available that provides the easiest getting started
experience for Windows. You can continue using the .zip approach if you prefer.
This package is free to use under the Elastic license. It contains open source and free commercial features and access to paid commercial features. Start a 30-day trial to try out all of the paid commercial features. See the Subscriptions page for information about Elastic license levels.
On Windows the Elasticsearch machine learning feature requires the Microsoft Universal C Runtime library. This is built into Windows 10, Windows Server 2016 and more recent versions of Windows. For older versions of Windows it can be installed via Windows Update, or from a separate download. If you cannot install the Microsoft Universal C Runtime library you can still use the rest of Elasticsearch if you disable the machine learning feature.
The latest stable version of Elasticsearch can be found on the Download Elasticsearch page. Other versions can be found on the Past Releases page.
Elasticsearch includes a bundled version of OpenJDK from the JDK maintainers (GPLv2+CE). To use your own version of Java, see the JVM version requirements
Download and install the .zip package
editDownload the .zip archive for Elasticsearch v7.0.1 from: https://artifacts.elastic.co/downloads/elasticsearch/elasticsearch-7.0.1-windows-x86_64.zip
Alternatively, you can download the following package, which contains only features that are available under the Apache 2.0 license: https://artifacts.elastic.co/downloads/elasticsearch/elasticsearch-oss-7.0.1-windows-x86_64.zip
Unzip it with your favourite unzip tool. This will create a folder called
elasticsearch-7.0.1, which we will refer to as %ES_HOME%. In a terminal
window, cd to the %ES_HOME% directory, for instance:
cd c:\elasticsearch-7.0.1
Enable automatic creation of X-Pack indices
editX-Pack will try to automatically create a number of indices within Elasticsearch.
By default, Elasticsearch is configured to allow automatic index creation, and no
additional steps are required. However, if you have disabled automatic index
creation in Elasticsearch, you must configure
action.auto_create_index in elasticsearch.yml to allow
X-Pack to create the following indices:
action.auto_create_index: .monitoring*,.watches,.triggered_watches,.watcher-history*,.ml*
If you are using Logstash
or Beats then you will most likely
require additional index names in your action.auto_create_index setting, and
the exact value will depend on your local configuration. If you are unsure of
the correct value for your environment, you may consider setting the value to
* which will allow automatic creation of all indices.
Running Elasticsearch from the command line
editElasticsearch can be started from the command line as follows:
.\bin\elasticsearch.bat
By default, Elasticsearch runs in the foreground, prints its logs to STDOUT,
and can be stopped by pressing Ctrl-C.
Configuring Elasticsearch on the command line
editElasticsearch loads its configuration from the %ES_HOME%\config\elasticsearch.yml
file by default. The format of this config file is explained in
Configuring Elasticsearch.
Any settings that can be specified in the config file can also be specified on
the command line, using the -E syntax as follows:
.\bin\elasticsearch.bat -Ecluster.name=my_cluster -Enode.name=node_1
Values that contain spaces must be surrounded with quotes. For instance -Epath.logs="C:\My Logs\logs".
Typically, any cluster-wide settings (like cluster.name) should be
added to the elasticsearch.yml config file, while any node-specific settings
such as node.name could be specified on the command line.
Checking that Elasticsearch is running
editYou can test that your Elasticsearch node is running by sending an HTTP
request to port 9200 on localhost:
GET /
which should give you a response something like this:
{
  "name" : "Cp8oag6",
  "cluster_name" : "elasticsearch",
  "cluster_uuid" : "AT69_T_DTp-1qgIJlatQqA",
  "version" : {
    "number" : "7.0.1",
    "build_flavor" : "default",
    "build_type" : "tar",
    "build_hash" : "f27399d",
    "build_date" : "2016-03-30T09:51:41.449Z",
    "build_snapshot" : false,
    "lucene_version" : "8.0.0",
    "minimum_wire_compatibility_version" : "1.2.3",
    "minimum_index_compatibility_version" : "1.2.3"
  },
  "tagline" : "You Know, for Search"
}
Installing Elasticsearch as a Service on Windows
editElasticsearch can be installed as a service to run in the background or start
automatically at boot time without any user interaction. This can be achieved
through the elasticsearch-service.bat script in the bin\ folder which allows one to
install, remove, manage or configure the service and potentially start and
stop the service, all from the command-line.
c:\elasticsearch-7.0.1\bin>elasticsearch-service.bat

Usage: elasticsearch-service.bat install|remove|start|stop|manager [SERVICE_ID]
The script requires one parameter (the command to execute) followed by an optional one indicating the service id (useful when installing multiple Elasticsearch services).
The commands available are:
|
|
Install Elasticsearch as a service |
|
|
Remove the installed Elasticsearch service (and stop the service if started) |
|
|
Start the Elasticsearch service (if installed) |
|
|
Stop the Elasticsearch service (if started) |
|
|
Start a GUI for managing the installed service |
The name of the service and the value of JAVA_HOME will be made available during install:
c:\elasticsearch-7.0.1\bin>elasticsearch-service.bat install
Installing service      :  "elasticsearch-service-x64"
Using JAVA_HOME (64-bit):  "c:\jvm\jdk1.8"
The service 'elasticsearch-service-x64' has been installed.
While a JRE can be used for the Elasticsearch service, due to its use of a client VM (as opposed to a server JVM which offers better performance for long-running applications) its usage is discouraged and a warning will be issued.
The system environment variable JAVA_HOME should be set to the path to
the JDK installation that you want the service to use. If you upgrade the JDK,
you are not required to the reinstall the service but you must set the value of
the system environment variable JAVA_HOME to the path to the new JDK
installation. However, upgrading across JVM types (e.g. JRE versus SE) is not
supported, and does require the service to be reinstalled.
Customizing service settings
editThe Elasticsearch service can be configured prior to installation by setting the following environment variables (either using the set command from the command line, or through the System Properties->Environment Variables GUI).
|
|
A unique identifier for the service. Useful if installing multiple instances
on the same machine. Defaults to |
|
|
The user to run as, defaults to the local system account. |
|
|
The password for the user specified in |
|
|
The name of the service. Defaults to |
|
|
The description of the service. Defaults to |
|
|
The installation directory of the desired JVM to run the service under. |
|
|
Service log directory, defaults to |
|
|
Configuration file directory (which needs to include |
|
|
Any additional JVM system properties you may want to apply. |
|
|
Startup mode for the service. Can be either |
|
|
The timeout in seconds that procrun waits for service to exit gracefully. Defaults to |
At its core, elasticsearch-service.bat relies on Apache Commons Daemon project
to install the service. Environment variables set prior to the service installation are copied and will be used during the service lifecycle. This means any changes made to them after the installation will not be picked up unless the service is reinstalled.
On Windows, the heap size can be configured as for
any other Elasticsearch installation when running Elasticsearch from the
command line, or when installing Elasticsearch as a service for the
first time. To adjust the heap size for an already installed service,
use the service manager: bin\elasticsearch-service.bat manager.
The service automatically configures a private temporary directory for use
by Elasticsearch when it is running. This private temporary directory is
configured as a sub-directory of the private temporary directory for the user
running the installation. If the service will run under a different user, you
can configure the location of the temporary directory that the service should
use by setting the environment variable ES_TMPDIR to the preferred location
before you execute the service installation.
- Using the Manager GUI
-
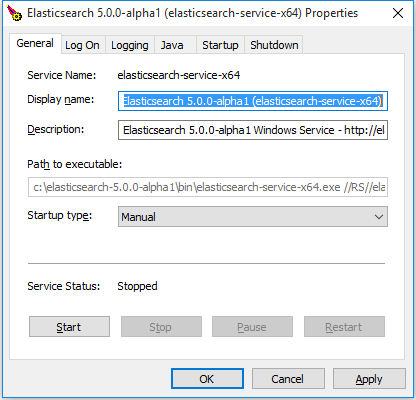
It is also possible to configure the service after it’s been installed using the manager GUI (
elasticsearch-service-mgr.exe), which offers insight into the installed service, including its status, startup type, JVM, start and stop settings amongst other things. Simply invokingelasticsearch-service.bat managerfrom the command-line will open up the manager window:
Most changes (like JVM settings) made through the manager GUI will require a restart of the service in order to take affect.
Directory layout of .zip archive
editThe .zip package is entirely self-contained. All files and directories are,
by default, contained within %ES_HOME% — the directory created when
unpacking the archive.
This is very convenient because you don’t have to create any directories to
start using Elasticsearch, and uninstalling Elasticsearch is as easy as
removing the %ES_HOME% directory. However, it is advisable to change the
default locations of the config directory, the data directory, and the logs
directory so that you do not delete important data later on.
| Type | Description | Default Location | Setting |
|---|---|---|---|
home |
Elasticsearch home directory or |
Directory created by unpacking the archive |
|
bin |
Binary scripts including |
|
|
conf |
Configuration files including |
|
|
data |
The location of the data files of each index / shard allocated on the node. Can hold multiple locations. |
|
|
logs |
Log files location. |
|
|
plugins |
Plugin files location. Each plugin will be contained in a subdirectory. |
|
|
repo |
Shared file system repository locations. Can hold multiple locations. A file system repository can be placed in to any subdirectory of any directory specified here. |
Not configured |
|
Next steps
editYou now have a test Elasticsearch environment set up. Before you start serious development or go into production with Elasticsearch, you must do some additional setup:
- Learn how to configure Elasticsearch.
- Configure important Elasticsearch settings.
- Configure important system settings.