It is time to say goodbye: This version of Elastic Cloud Enterprise has reached end-of-life (EOL) and is no longer supported.
The documentation for this version is no longer being maintained. If you are running this version, we strongly advise you to upgrade. For the latest information, see the current release documentation.
Example: A medium installation with separate management services
editExample: A medium installation with separate management services
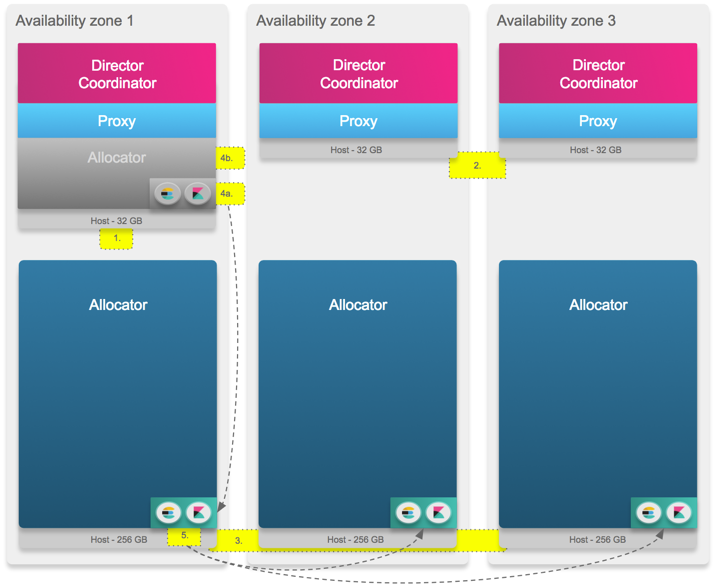
editWhat you get: A medium-sized Elastic Cloud Enterprise installation that separates out the allocators from the rest of your installation. Separating out the allocators helps prevent the workloads running on your Elasticsearch clusters and Kibana instances from affecting the ECE management services. The ECE management services provided by the directors and coordinators get placed on their own hosts, but still share hosts with your proxies.
This setup is safer than the small example and is suitable for many production setups, provided that the volume of user requests routed by the proxies does not affect the resources available to the ECE management services. If necessary, you can scale your installation to the large playbook example later on. (Not sure how to monitor the load on proxies? See Scenario: Knowing When You Need More Proxies.)

The numbered steps in the illustration match the steps in our instructions that begin with  . You need to perform some steps on more than one host, as indicated. Don’t forget to substitute the coordinator host and other information that is specific to your installation when you run the commands.
What you need:
- 3 hosts with at least 32 GB RAM each for directors and coordinators (ECE management services), and proxies
- 3 hosts with 256 GB RAM each for allocators
-
We recommend the following JVM heap sizes:
Service JVM Heap Size (Xms and Xmx) runner1 GB
allocator4 GB
proxy8 GB
zookeeper4 GB
director1 GB
constructor4 GB
admin-console4 GB
To deploy this Elastic Cloud Enterprise installation:
-
Install Elastic Cloud Enterprise on the first host to start a new installation with your first availability zone. This first host holds all runner roles to help bootstrap the rest of the installation, but you will remove some of its roles in a later step. After installation completes, copy down the coordinator host IP address, user credentials and roles token information. Keep this information safe.
bash <(curl -fsSL https://download.elastic.co/cloud/elastic-cloud-enterprise.sh) install --availability-zone MY_ZONE-1 --memory-settings '{"runner":{"xms":"1G","xmx":"1G"},"proxy":{"xms":"8G","xmx":"8G"},"zookeeper":{"xms":"4G","xmx":"4G"},"director":{"xms":"1G","xmx":"1G"},"constructor":{"xms":"4G","xmx":"4G"},"admin-console":{"xms":"4G","xmx":"4G"}}' -
Generate a new roles token that persists for one hour on the first host, so that other hosts can join your installation with the right role permissions in the next step (referred to as
MY_TOKEN). The new token needs to enable the director, coordinator and proxy runner roles.curl -k -H 'Content-Type: application/json' -u admin:PASSWORD https://localhost:12443/api/v1/platform/configuration/security/enrollment-tokens -d '{ "persistent": false, "roles": ["director", "coordinator", "proxy"] }' -
Install Elastic Cloud Enterprise on a second and third host, placing them into a second and a third availability zone, and assign them the
director,coordinatorandproxyroles. Do not assign theallocatorrole, as these runners should not handle any user requests. Make sure you include the coordinator host IP information from Step 1 and the new roles token from Step 2.bash <(curl -fsSL https://download.elastic.co/cloud/elastic-cloud-enterprise.sh) install --coordinator-host HOST_IP --roles-token 'MY_TOKEN' --roles "director,coordinator,proxy" --availability-zone MY_ZONE-2 --memory-settings '{"runner":{"xms":"1G","xmx":"1G"},"proxy":{"xms":"8G","xmx":"8G"},"zookeeper":{"xms":"4G","xmx":"4G"},"director":{"xms":"1G","xmx":"1G"},"constructor":{"xms":"4G","xmx":"4G"},"admin-console":{"xms":"4G","xmx":"4G"}}' bash <(curl -fsSL https://download.elastic.co/cloud/elastic-cloud-enterprise.sh) install --coordinator-host HOST_IP --roles-token 'MY_TOKEN' --roles "director,coordinator,proxy" --availability-zone MY_ZONE-3 --memory-settings '{"runner":{"xms":"1G","xmx":"1G"},"proxy":{"xms":"8G","xmx":"8G"},"zookeeper":{"xms":"4G","xmx":"4G"},"director":{"xms":"1G","xmx":"1G"},"constructor":{"xms":"4G","xmx":"4G"},"admin-console":{"xms":"4G","xmx":"4G"}}' -
To handle the Elasticsearch and Kibana workload, install Elastic Cloud Enterprise on a fourth, fifth, and sixth host, distributing them evenly across the existing three availability zones and assign them the
allocatorrole. Make sure you include the coordinator host IP information and allocator roles token from Step 1.bash <(curl -fsSL https://download.elastic.co/cloud/elastic-cloud-enterprise.sh) install --coordinator-host HOST_IP --roles-token 'ALLOCATOR_TOKEN' --roles "allocator" --availability-zone MY_ZONE-1 --memory-settings '{"runner":{"xms":"1G","xmx":"1G"},"allocator":{"xms":"4G","xmx":"4G"}}' bash <(curl -fsSL https://download.elastic.co/cloud/elastic-cloud-enterprise.sh) install --coordinator-host HOST_IP --roles-token 'ALLOCATOR_TOKEN' --roles "allocator" --availability-zone MY_ZONE-2 --memory-settings '{"runner":{"xms":"1G","xmx":"1G"},"allocator":{"xms":"4G","xmx":"4G"}}' bash <(curl -fsSL https://download.elastic.co/cloud/elastic-cloud-enterprise.sh) install --coordinator-host HOST_IP --roles-token 'ALLOCATOR_TOKEN' --roles "allocator" --availability-zone MY_ZONE-3 --memory-settings '{"runner":{"xms":"1G","xmx":"1G"},"allocator":{"xms":"4G","xmx":"4G"}}' -
Modify the first host you installed Elastic Cloud Enterprise on to prevent it from handling user requests:
- Enable maintenance mode to prevent new Elasticsearch clusters and Kibana instances from being provisioned on the host whilst it still holds the allocator role.
-
Move all nodes off the first host in preparation for removing the allocator role. This step moves the ES admin deployment and ES logging deployment that are part of the Elastic Cloud Enterprise administration console, shown as
admin-console-elasticsearchandlogging-and-metricsin the Cloud UI. Elasticsearch clusters and Kibana instances cannot be moved at the same time, so move one after the other. Verify that both Elasticsearch clusters and Kibana instances have been moved to another allocator.Moving all nodes can take a few minutes. You can check progress on the Activity page.
Set a target allocator under the advanced options when moving nodes to make sure the nodes do not end up on the same allocator again. By default, moving a node moves it to any allocator that has enough capacity.
- After all Elasticsearch cluster nodes and Kibana instances have finished moving off the first host, remove the allocator role so that the first host is no longer handling any Elasticsearch or Kibana workloads.
At this point, the first host you installed Elastic Cloud Enterprise on should hold only the coordinator, director and proxy roles, making it the third runner to hold these roles along with the runners created in Step 3.
-
Change the deployment configuration for the
admin-console-elasticsearchandlogging-and-metricsclusters to use three availability zones and resize the nodes to use at least 4 GB of RAM. This change makes sure that the clusters used by the administration console are highly available and provisioned sufficiently.
For production setups, perform the post-installation steps next.